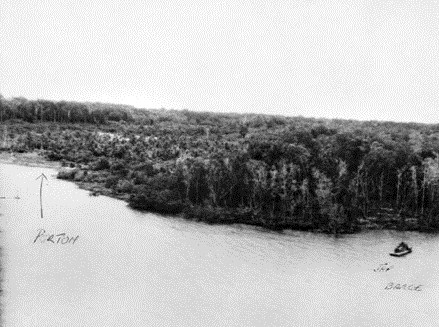
 Porton Plantation landing area
 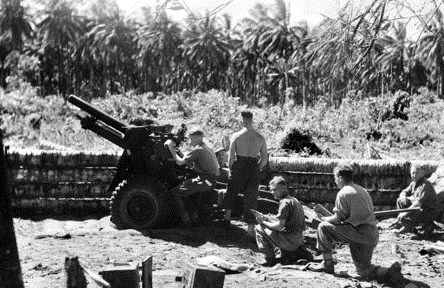 4 Fd Regt gun position
 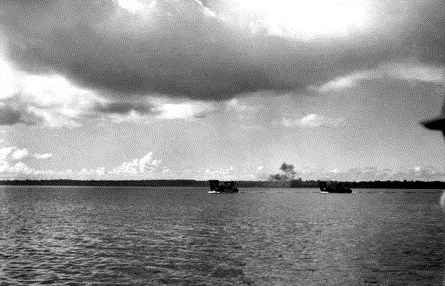 ALCs evacuating wounded
 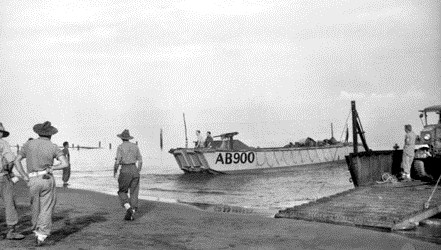 LCAs at beach assembly area
 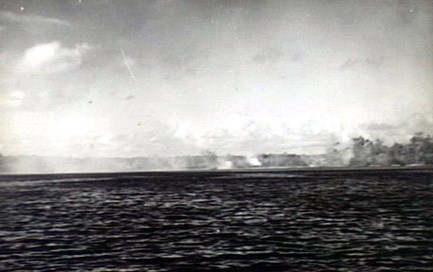 Covering fire on the beach
 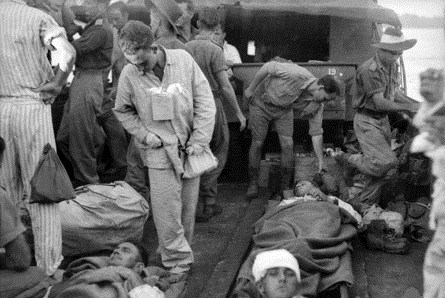 Wounded in evacuating LCA
  LCAs attempting evacuation under fire
 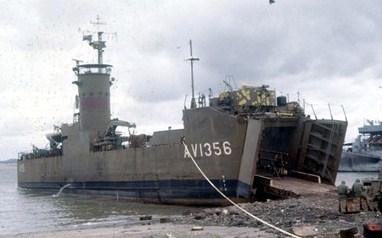 LCM Clive Steele at Vung Tau
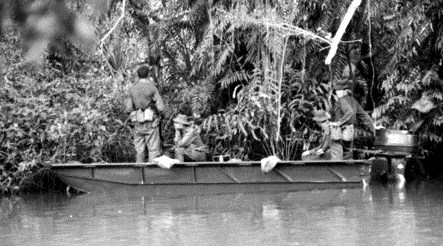 Assault boat used by infantry in calm waters in Vietnam
Porton
Australia's Mini-Dunkirk
The Operation 1
By June 1945 operations by 2 Aust Corps in northern Bougainville saw 11 Bde pitted against 2,000 Japanese Naval troops, organized into five battalions, which were defending the Bonis Peninsula. The three battalions of 11 Bde were worn down to about half strength, and with one battalion holding the front of 8 km of jungle against a nominally superior enemy, little progress was being made. In addition, the enemy was conducting a vigorous ambush programme, against both 11 Bde patrols and the jeep-trains which supported the front line.
To turn the situation around, it was decided to outflank the Japanese front by landing a reinforced company of 31/51 Bn at Porton Plantation behind their lines. This tactic had worked previously at Toko and the Soroken Peninsula, however this was different as air reconnaissance had located enemy troops and bunkers in the beach area: a night insertion was planned with artillery support in range and air reconnaissance support available. F Det 42 Aust Landing Craft Coy, with eight Landing Craft Assault (LCA) and four Australian Landing Craft 15 (ALC), was in support of 11 Bde.
The plan was for three LCAs to land one company, then three ALCs as follow-up group to guard the beachhead and land heavy weapons, with an extra platoon to be landed the following night to reinforce the landing. A second company was available to reinforce the position if necessary. However although the Landing craft Detachment commander, after studying the reefs shown in aerial photographs, recommended that the operation take place at full tide, the original plan was adhered to.
At 0357 hrs 8 June the assault company arrived 300 metres north of the intended landing place, grounding 45m offshore, the troops wading ashore and establishing a perimeter 100 metres inland. The second wave met machine gun fire, was unable to unload the mortars and ammunition, and as a foretaste of things to come, only one of the three ALCs was able to retract: the other two were stuck on the coral reef.
The infantry patrolled forward, and found themselves encircled by an arc of bunkers 400 metres in radius. This was reinforced throughout the day, with the number of automatic weapons increasing, and mortar rounds lobbing into the company position. That night five more landing craft made two abortive attempts to land reinforcements and ammunition, withdrawing under intense fire. The following day, with the company under intense pressure, sustained only by 4 Fd Regt and fighter ground attack support, a decision was made to withdraw the landing force.
Due to the seriousness of the situation, this evacuation was advanced from late evening to late afternoon and, under observed enemy fire, the force was taken aboard three ALCs, which grounded under the overload, one partially sunk. Two were eventually extricated, the remaining one with 60 on board having to survive under constant attack until the survivors were extricated the night of the following day. While losses during the beachhead operation were light at four killed and seven wounded, and none was lost during the actual infantry embarkation, during the aftermath the total climbed to 23 killed and 106 wounded including the landing craft crews and other rescuers.
The Japanese View of the Operation 2
The repulse of the Australian attempt to land near Porton on 8th, 9th and 10th June greatly lifted the spirits of the Japanese. Observers reported that the landing was on a rough strip of beach and the enemy were in difficulties negotiating the reefs. The surrounding high ground commanded an excellent view of the landing point, and presented ideal positions for the siting of automatic weapons. Kato rushed 150 troops to the area from Chabai to reinforce approximately 100 men in contact. These troops were able to prevent any further enemy landings and the enemy were pushed back to the beach, from where their remaining troops were hurriedly evacuated.
The 42 Aust Landing Craft Coy
View of the Evacuation 3
After Phase 1 – the lodgement on night 7/8 June – Phase 2 was the reinforcement of the company ashore on night 8/9 June with two additional platoons and replacement of the lost ammunition and stores. One ALC and four LCA were to be used, the latter in two waves, with the ALC in reserve out of enemy fire.
First Attempt – Night 8/9 June: The convoy left at 2100 hrs, lost one ALC to engine trouble, and arrived at Porton 2234 hrs; 4 Fd Regt was shelling enemy positions. At 2245 hrs the bombardment ceased, and the first wave went in at 2245 hrs, coming under heavy small arms fire from front and flanks. As it was low tide, the reef could not be crossed, and the craft withdrew under fire for another attempt at 2315 hrs. With the second attempt grounding 35 metres from the shore, and under heavy fire, no landing was possible and the craft again withdrew. The convoy returned to a safe beach and offloaded.
Second Attempt – Night 8/9 June. An 11 Bde conference ensued, at which a reattempt was decided on – two LCA loaded with the reinforcements and stores to beach, with a third to provide covering fire with its twin Vickers and 50 cal machine guns. The convoy left at 0245 hrs, but the supporting LCA lost contact, and at 0300 hrs, the two landing ones attempted to beach. Again the enemy fire was too intense to permit unloading, so they were ordered by 2ic 31/51 Bn to withdraw. The convoy returned and again unloaded, then returned to its base at Saposa to repair the mechanical and structural damage sustained from the reef and enemy fire.
Early on the afternoon of 9 June F Det 42 Aust Landing Craft Coy was ordered to produce three LCAs and two ALCs to evacuate the force at Porton. As only one LCA was fit for duty out of the detachment’s 12 vessels, a crash repair effort produced the required craft by 1430 hrs, which arrived at Porton at 1540 hrs. The LCAs went directly in, while the ALCs stood offshore to receive the evacuees as they were ferried out. When the LCA came under heavy small arms fire from the shore, they responded with their own machine guns.
They grounded 25 metres out, and lowered their bow doors to receive the infantry who poured aboard from the beach. However this was the undoing of an effective evacuation – the overloaded craft were unable to retract with the excessive weight on board, and remained grounded under continuous fire, ameliorated only by return fire from the craft, 4 Fd Regt artillery fire directed from one of the LCAs, and RNZAF and RAAF Corsair and Boomerang ground attack aircraft. The gunners and an engine hand on two craft were killed, and other crewmen wounded.
To lighten load, the infantry had to leave the protection of the hulls and jump overboard, where many became casualties to the enemy fire. One vessel retracted successfully, ferried its load out to a waiting ALC, and attempted to return for another from the stranded craft, but with one engine dead, damaged steering and making water fast through its holed hull, it was called back.
Four more ALCs now arrived from base on their own initiative, ‘going to the sound of the battle’, one moving in to pick up swimmers from one of the stranded craft. At 1930 hrs another LCA also arrived and, covered by fire from an accompanying craft, attempted to reach the two stranded ones. The gunship ran hard up on a reef, but the rescue craft successfully evacuated one vessel and took aboard the crew of the gunship. However its exhaust pipes were holed and a succession of crewmen had to man the engine room until each was disabled by the fumes and relieved.
One of the two craft was finally pulled off the reef, but as the tide had now fallen, it was impossible to attempt another rescue of the last stranded vessel, which had 38 infantry still aboard and was half full of water. The fleet loaded with casualties then returned to base.
Phase 3 – Second Stage Evacuation 10 June
An ALC with a party of Battalion HQ and Engineer volunteers aboard arrived at 1400 hrs on 10 June to effect a last ditch rescue on the remaining craft’s occupants. The attempt was covered by an ALC making a strafing run along the beach, with supporting fire from artillery and RNZAF-RAAF aircraft, including smoke to screen it. An LCA approached the stranded vessel but was driven off by intense enemy fire. Under cover of dark at 2030 hrs, two ALCs moved stealthily in, launching three folding dinghies crewed by engineers, which successfully extricated the survivors. The convoy returned to base by 0415 hrs with the mission completed.
Of the 12 craft engaged, one vessel was lost, a second badly damaged, and the remainder retrieved; but most craft were damaged by small arms and anti-tank fire. Of the 55 crew engaged, five were killed and seven wounded; one crewman who was separated during the melee swam eight km back to base. The Detachment expended about 33,000 rounds in the fire fight over the three days. This dogged and courageous effort by 42 Aust Landing Craft Coy was at the heart of saving most of the infantry from their impossible predicament, as recognised by CO 31/51 Aust Inf Bn in a letter to the unit:
Much credit for the success of the evacuation of the force is due to the courageous efforts of the landing craft coy in pushing their craft to the beach in the face of heavy enemy fire and total disregard for their own safety.
It is the Australian way to recover its servicemen who are isolated and under threat, but the question arises in the first place on the decision of exposing them to an amphibious operation against a vigorous and inventive enemy known to be in position, without the naval and firepower support necessary for successful opposed amphibious landings and withdrawal if necessary.
Afternote: Operation Woolwich 4
A potentially similar situation arose in South Vietnam in 1969. Commander 1 ATF was temporarily absent, and during this absence it was decided to land infantry sub-units on a beach north of Vung Tau to support an operation in the Long Hai Hills. As 1 ATF was under operational control of US II Field Force Vietnam, HQ AFV was not in the operational command chain, and so the first indication of this impending operation was a request from 2 AOD for authority to release a large number of life jackets. A telephone attempt to gain clarification for this request was frustrated by not having a secure line; however some circuitous talking with the 1 ALSG Commander indicated that an amphibious operation was being planned.
By similar discussions on the Movements net, it was ascertained that it involved LSM Clive Steele accompanying eight US landing craft discharging two infantry companies, without supporting fire other than the ships’ Bofors and machine guns. A lead platoon and clearance divers, delivered in assault boats, were to secure the beach. At HQ AFV, a check of beach reconnaissance reports, the weather forecast and tides produced unsettling results – rough conditions with a southerly drift were predicted, and there was a sandbank offshore which could ground the landing craft at the time of tide. The planners of the operation had not consulted the LSM commander (who was designated Sea Convoy Commander) on the maritime aspects during the appreciation. A prior reconnaissance of the beach was not conducted to avoid compromising the plan, yet the standard headings of an Appreciation of the Situation included Ground and Meteorology, and even such major amphibious operations as D Day, the Oboe series in Borneo, and the landing at Jacquinot Bay in New Britain, were based on proper reconnaissances and predictions while still retaining security.
In view of the adverse factors, authorisation of issue of the lifejackets was refused, and the story as it was known was referred to the Force Commander. An officer was dispatched on the Wallaby Courier to HQ 1 ATF at Nui Dat, returning with a copy of the operation order. In the face of the known facts and assessments at HQ AFV, the Force Commander ordered abandonment of the amphibious segment of the overall operation. This caused resentment within the Task Force, as the Force Commander was a National Component Commander, not an operational commander. However his Directive did have a sanction on the commitment of Australian forces, and although such a detailed intervention was not envisaged, it was decided to use it in the circumstances.
A potentially serious risk was thus averted only by lifejackets being a controlled store requiring higher headquarters release. While there was no identified enemy force at the beach, it was uncleared territory, and even a small enemy party could have inflicted horrendous casualties on infantry in small boats over several hundred metres of traverse, supported only by lightly-armed army watercraft offshore. And there was also the factor of rough water and sandbar in exposed ocean water. Apart from the possibility of serious military failure, it was potentially a nightmare scenario in a hyper-charged Australian domestic context.
The benchmark for the conduct of amphibious operations is the provision of the full spectrum of intelligence, planning and firepower – air, naval gunfire, and artillery where possible. Amphibious landings, large and small, are knife-edge operations, and demand the best possible chance of success, and the capacity for extraction if necessary. The spectre of Porton provides an exemplary warning on the risks of amphibious operations not conducted with the full array of planning and support.
1. Principal source Long Official History of World War 2 vol 1.7 p208-216.
2. Excerpt from Long vol 1.7 p216.
3. Principal source AWM 54 613/6/11 42 Aust Landing Craft Coy RAE Report on Operation Porton 8/11 Jun 45;
4. Principal source AWM 95 7/5/23 Pt 2 Operation Order 8/69 dated 21 April 1969 especially Annex D and its Appendix 1, and enclosure C/10. Primary evidence W. Barsley, K. Duncan, N. Lindsay.