


Chapter 15
World War 2
The Australian Base
The beginnings of World War 2 were not dissimilar in prospect to those of the Great War. On 3 September 1939 Australia and the other self governing nations of the British Empire followed the United Kingdom into a war in Europe, with the usual spillover to the Middle East and maritime threats on the high seas. While Japan remained a worrying future threat in the region, Australia's commitment was once again to provide combat forces to operate overseas within the framework of and supported by the British forces, and to act as a source of strategic materials, while the militia divisions trained and provided for home security. This role was accepted and followed for most of the first two years of the war until the deteriorating prospects in the Pacific forced a belated upgrading of both operational forces and the logistics infrastructure in the home base.
An immediate effect of the Australian Government's acceptance that the United Kingdom's declaration of war on Germany was also operative for Australia was the call up of the militia to undergo one month training, half at a time, and an offer of a mirror of the earlier war's 20,000-man expeditionary force. The next impact was to find the equipment for the force, which meant finally biting the bullet on motorisation. In default of a substantial purchase of trucks for the Army in the pre-war warning period which unmasked Treasurer Hasluck's claim that 'Defence can have any money that it wants', a plan to impress vehicles existed, but was implemented as voluntary hiring rather than acquisition after the declaration. However while the civil community was effectively motorised, in contrast to the horsed Army of 1939, the types, makes, ages, condition and repair parts situation of this potential pool made it a very weak reed on which to not only equip the new 6th Division but also transform the remaining seven divisions and meet the Army's other expanded operating requirements 1.
Implementation of the hiring plan devolved largely on the AASC, as had the initial horse and wagon procurement of 1914. In each State, regional sections of AASC Vehicle Collection Centres assessed and accepted vehicles suitable for military use and forwarded them to Vehicle Reception Depots for repainting, reconditioning and issue to units. These commercial acquisitions did little to meet the need for field-performance vehicles and even less for the 3,000 odd needed for the initial AIF division. Not that there was unanimity on the need for these vehicles as the self confessed experts in Department of Treasury argued that procurement for the AIF be suspended until it had been determined if it was necessary for motor transport to accompany the force overseas. Some sanity prevailed and an order for 784 trucks for 6th Division and 2,860 for the Militia was proceeded with, although both these allocations were at training scales only. Succeeding AIF divisions were equipped with vehicles overseas, while Militia vehicles additional to the training pool continued to be sourced from hiring, until impressment was substituted nearly a year after the outbreak of war. This continued for two years until responsibility was transferred from AASC to AAOC, and the VCC and VRD were disbanded 2.
The influx of recruits for both AIF and Militia required a means of recruit and technical training if the operative units themselves were not to remain as basic training units. While the latter had been acceptable enough in World War 1, when there was no home threat and the first AIF had established its own comprehensive training system overseas, Australia's now deteriorating strategic environment increasingly placed the home-based divisions in a ready field force role. AASC training units were opened, then expanded to AASC Training Depots in each of the four Commands – Northern, Eastern, Southern and Western. These were supplemented by various specialist schools for general and technical training, operating under names which varied as the home command structure changed from commands to lines of communication areas and armies. The AASC School changed name and function, regional MT schools opened and courses in vehicle maintenance, petroleum, food technology and inspection were conducted by civilian organisations 3.
Progressively an infrastructure was built up to supply and move forces firstly for the home defence plan, then as the focus switched to the Pacific theatre, to maintain the forces training for and operating in the New Guinea and Island campaigns. An early move in this was the opening of the overland supply link between the Alice Springs and Larrimah rail terminals and also a feeder route from the Mt Isa terminal. The massive increase in full time duty forces in 1942 resulted in a network of base supply and petroleum depots stocking local detailed issue depots at areas of troop concentration, and the opening of Supply Reserve Depots at Lilyfreld and Bandiana in 1943 to support the Australian and allied forces operating to the north. The strength of AASC involvement in the home base grew to a peak of over 25,000 to meet these liabilities 4; the identification, distribution and operating relationships of the units involved in each State have been covered in Chapters 6-12. It was a massive effort compared with the economy models which had preceded it in the previous war and the peace time forces; it was also one in which the almost invariable solution to a need was to raise a military unit rather than explore the build up of civilian infrastructure to provide an acceptable alternative. The result was an array of military units doing civilian tasks in areas where there was no direct threat, and many of the soldiers committed to these routine and not obviously war-related tasks, particularly those who had volunteered for overseas service to defend their country, bitterly resented being kept away from the action.
Western Desert
Those who had taken the plunge in joining the AIF when its employment overseas was uncertain were rewarded in joining the Middle East command in Palestine from February 1940 to train in preparation for deployment with the British Expeditionary Force in France, but history was about to repeat itself. Included in the force which set up camp at Qastina, then in April at Barbara, were half of 6 Div Sup CoIn, and from corps troops 6 Div Amn Sub-Park, under command of CAASC Lieut-Col N.B. Loveridge DSO, erstwhile CO of Anzac Mtd Div Train in World War 1. The majority of 6 Div Pet coy and 6 Div Amn Coy remained at Puckapunyal awaiting subsequent convoys, the second in May comprising the bulk of those companies. But the third containing 18th Brigade and a section of each of the two companies was diverted to England around the Cape of Good Hope, owing to the threat to shipping which developed in the Red Sea on Italy's entry to the war; thereafter they ceased to be part of 6th Division AASC. From the units then in Palestine a Composite Company was formed to move to Egypt in September with 16th Brigade Group, and three supply personnel sections and a port detachment were raised, from 6 Div AASC and members of the AASC Training Unit, to provide lines of communications support units for the coming operations in Egypt 5.
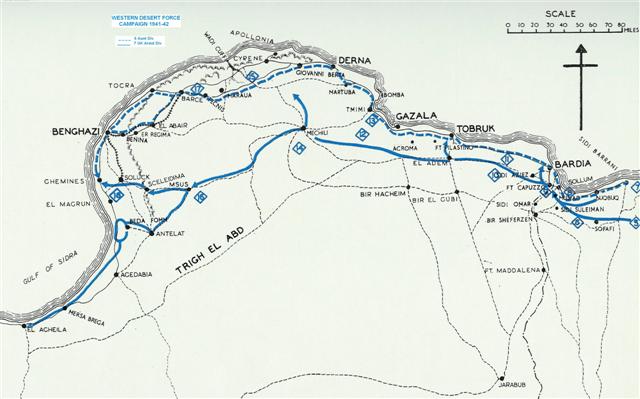
6th Division was concentrated in Egypt in November and, on entry into the Western Desert operations in December, the system of operational support was organised on the RASC Base Supply Depot at the Suez Canal, through the Alexandria Supply Depot, then Field Supply Depots and Forward Ammunition Depots progressively strung out during the advance through Libya and the pursuit into Cyrenaica. These Depots were opened and closed as required, most of them being given consecutive numbers: 1 and 2 Sup Pers Sects controlled FSDs issuing rations and fuel in the rear area at Helouan, Ikingi Maryut and Qasaba, and in forward operations No 8 (Sollum), 13 (Bomba), 15 (Slonta), 17 (Barce), and 18 (Magrun) for supplies and POL; 6 Div Amn Coy operated FADs adjacent to FSDs: No 11 (Tobruk), 13 (Bomba) and 15 (Tecnis), the remainder in the sequence being operated by RASC and NZASC units. The Divisional AASC drew from their own and any other depot where appropriate, issuing to supported units from supply, petrol and ammunition points at convenient locations in their rear. Replenishment of the depots, although normally a third Iine task, was assisted by the divisional AASC, at times supplemented by unit transport, from resupply delivered across the desert road, then through Sollum, Tobruk, Derna and other ports after their capture.
Western Desert Support
The transport picture was grim as the 3 ton 4x2 vehicles brought from Australia were less than suitable and short of repair parts, so when after the fall of Mersa Matruh the units were invited to send a 30 man 'scrounging party' to acquire captured Italian trucks and trailers, this was taken up with alacrity, the 5 and 10 ton diesels with trailers so acquired becoming the salvation of the subsequent transport effort. The transport pool had the task of first stocking the advanced depots, then dumping programmes to establish the ammunition resources for 6th Division's assaults on the fortresses of Bardia 3-5 January 1941, Tobruk 22 January and Derna 30 January; there was then the task of operating the issue points to supply the fighting units with their needs. By the text book, this should have been an orderly affair of corps AASC units delivering from railhead to divisional AASC units, for them to distribute to user units. In practice, HQ AASC had to use whatever resources were to hand to clear from the docks at Tobruk, superseded forward depots or any other source, including captured enemy dumps, and get it forward by any means possible. After the capture of Derna all transport was diverted to infantry trooplift in pursuit of the retreating Italians through Cyrenaica 6. Capt D.M. Russell of 2/4 Bn, who later commanded a scratch infantry unit including an AASC infantry company in Crete, claimed that in Cyrenaica the infantry had to live on captured Italian dumps as 'the AASC was three days behind’ 7; he omitted to look past the floorboards of the trucks they were riding in to discover that the AASC was really with them, carrying the battalions and not supplies in the rear. Another diarist who complained of the ASC's lack of road discipline might better have reflected on what the objective was. It was British General O'Connor's command decision to take the risks in a headlong pursuit which resulted in annihilation of the Italian Tenth Army at some cost to normal maintenance procedures, but with the prize of an absolute victory.
This onwards push resulted in the forward AASC units being up to Benghazi on 7 February and to the line of exploitation in front of Agedabia, at which stage Churchill’s decision to commit forces to the defence of Greece put the force on the defensive, providing the window of opportunity for Rommel's Africa Korps to be inserted into the theatre. The interim breathing space allowed the Divisional AASC to return to Tobruk to begin rebuilding stocks in the forward areas which were relying too much on captured food and fuel; they were also carrying the additional load of looking after nearly 50,000 prisoners in Bardia, but that problem was ameliorated by the ex-garrison's own stocks. On 12 March these tasks came to an end on handover to 9 Div AASC and return to the Delta to prepare for embarkation for Greece 8. On 24 March 1941 Rommel launched his first counter attack from El Agheila and, by outflanking the proposed defensive position at Antelat through Mechili, inaugurated the '1st Benghazi Handicap' back towards Egypt. Blocking positions by 26th Brigade at Tmimi and 20th Brigade at Gazala bought some opportunity for retreating units and stragglers to concentrate at Tobruk, not the least being 9 Div Amn Coy which had been dispersed across Cyrenaica supplying, extricating and destroying ammunition stocks, eventually getting most of its sections back in as well. The last elements arrived in Tobruk on 10 April closely followed by the Afrika Corps 9.
Tobruk
The AASC component of the Tobruk garrison was more than equal to the task, comprising HQ AASC 9 Div, 9 Div Amn Coy, 9 Div Pet Coy, 9 Div Sup Coln and 7 Div Sup Coln, with also under command 309, 345, 346 and 550 Res MT Coys RASC; additional RASC base units under the UK 76 Base Sub-Area included a base supply depot, bulk petroleum storage company, reserve petroleum depot, field bakeries and butchery, cold storage depot, plus two DIDs and two FSDs 10. The static nature of the defence of Tobruk had two major effects on the AASC units: firstly replenishment of units was effected by unit collection from static detail issue depots for food, fuel and ammunition; and secondly the surplus of transport elements so liberated was available for other employment or evacuation from the garrison.
After the initial attacks had been contained, garrison commander Maj Gen L.J. Morshead, concerned to establish the maximum depth in the fortress, decided to raise an infantry battalion from the ranks of 9 Div AASC, though difficulties with support weapons changed this to four infantry companies and a carrier section. On 27 April A Coy and the carrier section commanded by Capt J.C. Taylor relieved 2/43 Bn in 24th Brigade's sector in the east of the line, occupying 4,000 metres of the perimeter covering the Wadi Zeitun from the coast in to the head of the wadi on the Bardia Road, with first 2/23 Bn, Iater 2/43 Bn, on its right. It was to hold this position until immediately before the relief of the Australian troops began in September, the longest stint in the forward line by any unit in the garrison, and a factor recognised by Morshead in scheduling the order of return to Egypt. B Coy was held by 24lh Brigade in reserve until returned to its functional role in July. C Coy was first held in depth at Fort Pilastrino in the Blue Line, then was absorbed into 2/15 Bn, and D Coy (less 10 Pl) into 2/13 Bn, both of which saw heavy fighting in the early assaults and subsequent attacks to eliminate the Salient, taking heavy casualties. D Coy's 10 Pl was formed into a carrier platoon under 18 (Indian) Cav Regt at the western coast of the perimeter, then with 2/1 Pioneer Bn as part of 20th Brigade which also had C and D Coys, while 7 Div Sup Coln supplied a medium machine gun platoon for 2nd Northumberland Fusiliers 11.
The garrison was thinned out in July. The four RASC transport companies were evacuated, replaced by three formed from the AASC. No 1 Troop Carrying Coy, from B and part of A Inf Coys AASC commanded by Capt W.L. Day, was allotted to 18th Brigade to give it mobility for its counter-penetration role. No 2 Troop Carrying Coy from C and D Inf Coys AASC commanded by Capt J.N. Duncan similarly provided mobility to the reserve battalion of each brigade in the line. The third, Area Transport Coy from 7 Div Sup Coln under Capt H.C. Thompson, was used as general transport in the base area. A Vehicle Reception Depot was formed by Capt C.H. Locke in place of the evacuated 76 VRD RASC, and the British detailed issue depots were replaced by 9 Div Sup Coln, the departing ADS&T 76 Base Sub-Area handing over all S&T responsibilities to CAASC 9th Division. It is therefore apparent that the kindest reading of an RASC historian's statement that 'throughout the siege, the RASC with some AASC assistance ran supplies, transport, petrol and ammunition' is that it applied only in part and only to the first part of the siege 12.
Although A Inf Coy occupied a battalion's worth of perimeter, its time in the line was fairly quiet as anticipated, the rugged approaches to its area not being likely to attract any major assault. It was not, however, without its moments: on the night 30 April May a German raid on A Coy's Post 280 was turned away in a fire fight; its carrier section 'patrolled adventurously' and provided part of the supporting fire for a sortie on 13 May by a company of 2/43 Bn and a troop of tanks along the Bardia road, a debacle in which the AASC carriers helped screen the withdrawal 13. Meanwhile the remainder of the garrison's AASC and RASC had settled into the routine of support, running the base, air attacks on their positions and running the gauntlets of fire in moving about their tasks.
Tobruk Defensive Tasks
The range of these tasks was wide and often unusual. 9 Div Amn Coy published Tobruk Truth, issued with the rations to counter rumours and enemy propaganda 14. Ammunition duties, between meeting the expenditure peaks in repelling assaults on the fortress, included the disposal of Italian ammunition, much of it unsafe and the cause of several casualties to the unit. Unloading stores in the port was a hasty affair, the RAN's 'Scrap Iron Flotilla' running the air blockade and having to be turned around within an hour at night; CAASC Lieut-Col J.A. Watson had to raise a port detachment and impose strict transport control to ensure effective discharge in the time available, and Sgt E.S. Hodgson was attached to the Base Sub-Area staff to supervise the tug and lighter crews working the harbour. Misapplication of food, particularly attractive items, was endemic ranging from scrounging extra rations, through organised theft, to medical staff feathering their own nest in the name of the poor patients. An armed security guard with orders to shoot was placed around supply dumps until the previously detached platoon of D Inf Coy AASC was tasked with establishing a security store in the Senussi Cave, operating a rail line from the roadhead to the cave for more easily securable storage of the attractive stores 15.
Tobruk Base Tasks
Relief of the 9th Division by 70th (UK) Division began for the AASC with arrival of the Polish ASC to take over the Area Transport Coy in late August, but a new Res MT Coy had to be formed from the two troop carrying companies to handle movement of the incoming and outgoing divisions through the port. A Inf Coy came out of the perimeter into the reserve line on 9 September, then a month later was tasked with operating the prisoner of war compound, but was relieved immediately and evacuated in the first wave at Morshead's direction on 12 October. HQ ASC 70 Div and its units were in control by 21 October and the main body was evacuated by sea under air attack to Julis Camp in southern Palestine, leaving a rear party of 70 to follow 16. Watson had had under his control nearly two and a half thousand men, a thousand vehicles, several food, fuel ammunition and vehicle depots and workshops, plus a wide range of peripheral duties, as had his men and those detached in the infantry, cavalry, machine gun, rail and medical transport, port and water transport details. The galloping grocers were nothing if not versatile, and did not need elaborate command structures to manage those massive resources, relying on energetic, relatively junior officers to fulfil both routine and independent tasks while controlling significant bodies of men and equipment. The modern trend to have increasingly higher rank to command increasingly insignificant groupings looks bankrupt beside this practical example of can-do, which was not unique, being mirrored in the earlier and later campaigns in the Middle East and Pacific.
Greece and Crete
Withdrawal of 6th Division and 2nd NZ Division from Cyrenaica Force, which had left it so seriously incapable, also committed the departing divisions to an equally impossible mission in northern Greece. The Greek Army itself was similarly overcommitted, having to defend its Albanian border and Thrace but could not continue the defensive line in between along friendly Yugoslavia; so the immediate collapse of the latter left a wide gap through which the German forces poured, onto the Anzac Corps position on the Aliakmon River. The following actions in the campaign were a succession of withdrawals and eventual evacuation, largely at night due to the complete air superiority of the Luftwaffe, in which the AASC transport necessarily figured prominently and consequently lost heavily.
During-the relief of 6 Div AASC by its 9th Division counterpart in Libya in early March 1941, receipt of a 'mutilated signal' sparked the reorganisation of 6 Div AASC into a composite structure for service in the Greek campaign – 16, 17 and 19 Bde Composite Coys under Majs J. Talbot, T.A. Winchester and R.T. Cochrane respectively. 2/1 MAC left for Greece on 18 March, followed from 1 April onwards by the main body of the divisional AASC, 1 Corps Tps Sup Coln and detachment of the 1 Corps Pet Park. A week later 16 and 19 Coys were concentrated in northern Thessaly in support of the Aliakmon Line along a route crowded with troops and refugees, with 17 Coy just landing at Athens. As 19th Brigade was required to defend Vevi Pass forward of these positions, 350 donkeys were hired to support it off the road, and 30 DID was established at Perdika; 16th Brigade was similarly engaged at Veria Pass to the east. The first engagement on 10 April was followed by a precipitate withdrawal to the Aliakmon by the third day where, with the bridge blown, the donkeys were used to move the forward supplies stocks back over an improvised ferry. With a crumbling western flank of the Greek Central Macedonian Army, withdrawal to a temporary line holding the Thermopylai, Brallos and Delphi passes was decided on as the only way of stabilising the situation as a prelude to an attempt at evacuating the entire force from Greece 17.
Business for 16 and 19 Coys and the corps troops units in all this manoeuvring was brisk, carrying fuel, ammunition and rations forward to the brigades, moving battalions first forward then back, and evacuating such units as the Casualty Clearing Station which were not self mobile, playing a critical role in extricating the force from the enemy envelopment. Trooplifting the forward battalions out brought the companies under fire not only from the ever-present enemy aircraft but also from German armour and road blocks, one convoy with 16th Brigade having to diverge around Larissa cross country as the town was in enemy hands. When a convoy of 16 Coy evacuating troops at Pharsala came under attack from a dozen dive bombers Dvr F.L. Craig continued to respond with a machine gun, making himself a target until killed, providing a diversion which allowed most vehicles to get away. His citation with two officer witnesses from division and corps was watertight, but it was endorsed with the mixed recommendation ‘VC or M in D'; this silly vacillation cost Craig and the AASC the chance of award of a Victoria Cross. Another Dvr C.J. Cross of 1 Corps Tps Sup Coln was awarded the DCM for extricating an infantry patrol twice under fire when it was encircled by enemy tanks. Meanwhile 17 Coy, arriving late in several vessels days apart, was used on rear area protective duties, the other companies supporting 17th Brigade. Given initially an anti-parachutist role west of Larissa, its first task was delivering ammunition forward on 16 April, then evacuating ammunition back through Brallos Pass to Levadia as the withdrawal to the Thermopylai Line proceeded.
In the midst of this confused movement a decision was made to add to it by reorganising back to the commodity system of Supply Column, Ammunition Company and Petrol Company, each of the three companies exchanging their supply, ammunition and petrol sections. The composite system was still not understood by division or brigade general staffs, as indeed it was not even a year and a half later in 9th Division at El Alamein: they regarded the three companies as belonging to the three brigades, leaving the divisional troops half of the division and general tasks without any specific resources, so relying solely on the goodwill of the brigades to release the necessary resources. But the restructuring was particularly inexplicable as it was then known that an evacuation from Greece was imminent, and this regrouping moving over congested roads could add nothing to future operational efficiency 18.
Withdrawal to the Thermopylai line began on 20 April, armchair strategists outside the theatre hoping for a rerun of the 480 BCE defence against the Persians, totally ignorant not only of the recession of the sea from the pass in the intervening years leaving a good panzer manoeuvre area, but also of the fact that the historical engagement was no more than a holding operation to force a sea battle in the nearby Malian Gulf, never a considered attempt to defend Hellas on the land. Now there was neither a sea battle in the offing to justify the stand nor any better possibility of a land defence, as the Greek army gave way on the western flank just as the Phokians had so long before. The position was simply used to cover the inevitable evacuation, and was given up in three days as it had been to the Persians, 6th Division falling back to Athens' port and further on to the Peloponnese embarkation beaches. The evacuation of Greece began in earnest.
Withdrawal in Greece
AASC units were fully committed ferrying troops back to the evacuation beaches and defending the aerodromes around Athens, many tending to be among the last to be released for embarkation. An early evacuation party of ex-17 Coy members under Capt J.A.F. Anderson left on the unarmed SS Julia under successive air attacks which the AASC members held off by organised rifle fire. 6 Div Amn Coy (ex-17 Coy) evacuated the infantry and anti-tank unit rearguard from Brallos Pass, and the residue of the companies not committed to airfield defence and troop lifting crossed the Corinth Canal to be taken off near Argos; others were embarked near Athens, but many were stranded when released only after the last ships were gone. During the evacuation from the Peloponnese there was a cry from the infantry 'save the infantry'. While there may have been some logic in extricating scarce trained and battle-experienced battalions, there was similar logic in preserving scarce trained and experienced combat support and service support units. Avoidance of this inescapable logic is reflected in official histories in which the army and air force support troops are presented as a disorganised rabble, and from there that which passes for reasoning goes on that they were therefore expendable. The evacuation was spread from 24 to 27 April, and was effective in getting the best part of the whole force away but 6 Div AASC lost 229 prisoners – 20 percent of its strength and the greatest proportion of any organisation; 1 Corps Amn Park and 1 Corps Tps Sup Coln lost one and 23 respectively. Of course the rearguard is the position of honour and, although this would not be at the forefront of the minds of the planners of the evacuation or indeed of those today who have difficulty in giving service soldiers their due as a worthy part of the army, these AASC rear parties shared that honour with the infantry who were also sacrificed to hold the enemy back from the embarkation points 19.
Between 25 and 29 April remnants of Anzac Corps were disembarked on Crete, though some went directly to Alexandria. The main elements of 6 Div AASC were concentrated at Neon Korion, later escapees continuing to dribble in. There were only limited tasks, no vehicles being available: opening detail issue depots at Georgiopolis, Neon Korion, Retimo and Steelos from which units in the defensive positions drew their food, fuel and ammunition; and patrolling the Suda Bay area. As no transport and few weapons were landed, as many as possible of the divisional AASC were onloaded to Egypt, including HQ AASC 6 Div, leaving 19th Brigade AASC Officer Capt W.A. Bunting overall senior AASC officer. After patrolling duty around Neon Korion 2-9 May, most of those not actually manning depots had to give up their rifles, bren guns and ammunition to infantry who had not brought theirs out from Greece, and were evacuated to Egypt on 14 May. Others were incorporated into the defensive layout. The need to cover such a length of coast and also potential paratroop landing areas led to the formation of special fighting units from Army and RAF support organisations whose primary function no longer existed. Composite battalions were formed for Creforce of which one company was put together by Capt D.M. Russell, Transport officer of 19th Brigade, from 89 AASC members and drivers from HQ 27th Brigade who had been evacuated from Greece without their weapons. Armed with .30 Springfield rifles from a destroyer, they were called Rusty's Rifles and used in the Neon Korion airfield-Suda Bay sector 20.
Resupply from the RASC BSD at Kanea to Retimo was arranged initially by hired caique. Capt H.A. Morgan commanded the Retimo depot, Lieut B.W.T. Godly at Neon Korion, Lieut L.J. Tinker at Georgiopolis and Lieut C.H. Rivers the Steelos ammunition dump. The airborne invasion on 20 May was contained by Australian, British and Greek defenders at Suda and Heraklion, but succeeded at Kanea through the failure of New Zealand brigade commander Hargest to counter attack promptly at Maleme airfield, and so the island was lost. During the first week of fighting resupply from Kanea ceased, the force having to live on half rations from reserves and Lieut Godly arranging with the village mayor to bake bread and supply meat, for which the mayor and fifteen helpers were later executed by the Germans. Air attacks were minimised by good camouflage discipline but, after the local surrender, attempts by small parties to get to the evacuation beaches on the south of the island met with little success, most being hunted down and captured in the mountains: 68 were taken prisoner, while a few made daring escapes in company with members of other arms in an assortment of vessels 21.
At the end of May there was reassembled at the 6 Div AASC camp at Julis 556 men – just over half of those who had left there two months before. More drifted in from Crete, and the final tally from the 1,015 which had begun the campaign was 31 per cent killed and captured. From this slim remaining base the units were rebuilt, and the CAASC was given responsibility to put together 1 Aust Corps Troops – the Supply Column, Ammunition Park, Petrol Park, Ammunition Company, Supply Personnel Section, Reserve MT Company and Anti-aircraft Brigade AASC Company. But the attention of 1 Aust Corps had now been firmly directed to another operation to the north.
Syria
Not content with his Dardanelles-like misjudgement in Greece and Crete, Churchill then pressed for an equally misjudged 'walkover' capture of France's Syrian territory from the Vichy French forces, in which 7th Division was to be the major attacking formation. The growing realisation that commodity units did not provide adequate flexibility for the support of mobile operations or different phases of war, as had become well understood in World War 1, resulted in a regrouping into a composite company structure: 7 Div AASC Amn Coy as 21st Brigade Group ASC Coy, 7 Div Pet Coy as 25th Brigade Group ASC Coy and the borrowed corps troops 3 Amn Sub-Park plus Sup Pers Sect forming Div Tps ASC Coy. Allocation of the brigade titles was, however, a now repetitive mistake as the brigades again contested control of the units with the CAASC, so to reverse this they were renamed later as 4, 5 and 6 Coys to match the numbering system of the Artillery, Engineers and Field Ambulances, which were similarly and necessarily controlled at divisional level 22.
The RASC established FSDs at Acre and Rosh Pinna, FADs at Qirat Motskin railhead and Rosh Pinna from which the companies were to replenish. In order to meet the third line requirement to bridge the growing gap which the planned advance would open up, and for the troop carrying duties for which there was no capacity within the lean divisional companies, a Composite Res MT Coy was formed by Capt L.F. Stansfield from elements of the brigade companies, 2 Amn Sub-Park of 1 Aust Corps Amn Park and RASC units. The attack commenced on 8 June, 21st Brigade along the coast road, 25th Brigade Rosh Pinna-Metulla. As the advance continued, the condition of the inland roads soon made it expedient to support 25th Brigade from the coast road when a lateral road became available. There was also a period when Berryforce at Merdjayoun had to be supported so a composite group of elements from each of 25 Bde and Div Tps Coys was left at Rosh Pinna for this task until the responsibility was passed to the RASC. Thereafter 7 Div AASC followed the advance, establishing supply, petrol and ammunition points as dictated by the position of the forward units and forming ammunition dumps for the guns, culminating in the buildup for the Damour battle.
Support in Syria-Palestine
It quickly became apparent that gun ammunition expenditure was far higher than predicted, resulting in continuous running and several dumping programmes to accumulate stocks forward. With a shortage of vehicles from the start, the allocation to the ammunition, petrol and supply sections of each company had been carefully calculated to meet the expected tasks with no spares, so when the demand for 25pr ammunition escalated there was little flexibility to switch vehicles from other tasks, the alternative being simply continuous running and overloading. This might have produced a diminishing return on overtaxed men and equipment, but in view of the lack of spare capacity, arrangements had been made to form maintenance teams to both keep the vehicles in operating condition and let drivers rest after long shifts. For the six weeks of the campaign, despite the difficult inland roads and enemy artillery and machine gun fire, resupply was fully maintained, but a strong criticism to come from these operations was a serious lack of understanding of the system of replenishment by the forward units. While the AASC companies were eager to meet all demands, wooden headed staff officers of the brigades ordered unnecessary forward dumps of commodities which had no relation to tactical plans and needs, and artillery staff officers called for ammunition deliveries which, on arrival at the gun positions, were 'neither expected nor welcome', a wasted effort in an already overstretched replenishment system. Damour was taken on 9 July, an armistice following three days later, and a period of garrison duty followed, taken over by 9th Division after its release from Tobruk from mid-January 1942.
While the distances involved had not been great by Western Desert standards, the poor roads and tracks and very limited transport available had stretched both divisional and corps AASC units. As well as the standard maintenance and trooplift tasks there were others of a less usual nature: the Composite Res MT Coy was responsible for receipt and evacuation of captured French vehicles; some special elements were also manned – the Salvage Unit recovering usable materiel as the advance progressed, and a prisoner of war holding unit for each brigade. There were also augmentations from British artillery and anti-aircraft units, whose RASC detachments were incorporated in the 7 Div AASC companies and used on general support tasks as well. It was a short, intense campaign whose success from the AASC viewpoint was summarised by CAASC Lieut-Col H.M. Frencham as due to 'skill and courage of MT Drivers, discipline and devotion to duty of all ranks, skilled leadership of Officers and NCOs'. He might also have mentioned the careful forward planning, flexibility of approach to problems and extensive training which are so essential to success under operational pressures, but this takes nothing away from the performance of the men and the units 23.
After conclusion of the Syrian campaign, although there was a garrison task sideline, activities centred largely on reforming 1st Australian Corps as a properly constituted formation to meet the original objective, as was eventually achieved in World War 1, of having all Australian troops under national command and fighting as an entity. It had been a parallel objective of the British command to keep 'colonial' formations at the lowest level possible to facilitate their dovetailing into the British structure, and this tug of war had been active from the beginning, sometimes for urgent operational necessity, but always resisted by Blamey. Now the three divisions were out of contact, the situation in the Middle East had stabilised, and 1st Armoured Division was training and equipping in Australia to join 1st Corps and give it the punch necessary for operations in North Africa. But the other side of the coin was mobility, so the miscellany of AASC non-divisional units was restructured to form a corps troops transport column to resupply the divisions, a corps troops column to provide direct support to the mass of corps troops units, and a troop carrying column able to lift a division at a time. This aggregation of transport numbering over a thousand task vehicles was the greatest assembled in one command in the history of the AASC, but was not used in operations as Japan's entry into the war resulted in the recall of the 6th and 7th Divisions to the defence of Australia. Movement of 1st Armoured Division was cancelled, only 9th Division remaining in the Middle East to provide infantry backbone for the breaking of Rommel's power in the Western Desert.
El Alamein
The first half of 1942 was taken up by 9th Division after its relief from Tobruk in retraining and refitting in preparation for the battles ahead. At the beginning of the year the divisional supply column, ammunition and petrol companies finally converted to the composite system, becoming 10, 11 and 12 Coys AASC, each with three transport platoons and a composite platoon for supplies, petrol and ammunition duties. They were concentrated at the El Alamein defensive line by 11 July with 101 GT Coy from the departed Corps Troops Transport Column and 345 and 462 GT Coys RASC. Another addition was found to be a necessity – a Divisional Troops Company to look after the non-brigade units and corps units operating permanently with the division – this was raised by milking each of what was termed the brigade group companies and 101 GT Coy. The divisional staff still did not properly understand the use of the composite system, allotting companies to brigades, as opposed to each company supporting one third of the division, so forcing a shortfall which was not intended to exist. It was not until the very eve of the battle that the confusion of trying to coordinate into a divisional effort three companies, each claimed for priority by a brigade, was recognised, leading to a hasty reversion of them to control by the CAASC.
Preparations for the defensive battle of Alam Halfa, then the following offensive battle of Alamein, included the stockpiling of five days of commodities to cope with the usual German attempt at armoured encirclement. Fuel was supplied by RASC bulk tanker direct to most divisional units, with reserve stocks held in 44 and 4 gallon drums, until reversion to packed fuel replenishment through petrol points was made on the eve of the battle of Alamein. Issue of rations to units was effected through the new clockface method, where unit vehicles were loaded from vehicles positioned tailboard out in a circle. Water was issued through water points to unit water trailers and containers, with a divisional reserve in cans. 101 GT Coy under Maj A.H. Singleton was involved in building up reserves for the battle, particularly ammunition in early October. AII this was facilitated by the static nature of the defensive line and the steady build up, in Montgomery's usual way, of a large margin to ensure success. As part of an elaborate cover plan Capt E.P. Brandwood of 11 Coy took most of the Division's domestic vehicles on a 3 day trek south, stirring up as much dust as possible. Brigades drew hard rations regularly so that this would not become a warning of an impending attack, and gun ammunition reserves delivered into the forward areas, some of it prepositioned in front of the forward defended localities ready for use in the advance, were carefully camouflaged before morning 24.
Opening the attack on 23 October 1942 with 900 guns along the front created the anticipated drain on gun ammunition, which had been prepared for in the build up. In 9th Division's area 101 GT Coy had done that job in advance and now had the capacity for troop lifting, shuttling battalions to their forming up places, often under artillery and small arms fire. The efforts of the four divisional companies were notably unspectacular in execution, which reflected the careful preparation, high state of training and cool execution of tasks on time and under fire during the battle. Montgomery's 'crumbling operations' on the coastal sector in the middle of the battle, largely carried by 9th Division, created a heavy load in trooplifts and delivery of ammunition into the fighting area, and the flexibility of the composite system in a time of low food and fuel usage came to the fore. While the AASC companies were spared the heavy toll on the infantry, divisional commander Morshead was unequivocal in his appreciation of their 'excellent work', Watson receiving a DSO.
By 4 November the enemy withdrawal was in full swing and the companies had moved forward to operate from the Tel el Eisa station area. The following day they were tasked to lift 151st Infantry Brigade forward, ammunition and rations being dumped on the ground. This was then changed to supporting an advance by 20th Brigade, but this and then another troop lift task were cancelled to make 9th Division available for its foreshadowed return to Australia, a need subsequently accentuated by the failure of the American division sent to Papua as a quid pro quo for the 9th's retention in North Africa. When this confusion had ended, the companies were left with the task of recovering unexpended gun ammunition of 9th Division and 51st Highland Division to depots, then were returned to Palestine to prepare for return home 25, the heroes' welcome given to 9th Division which had been denied to 6th and 7th Divisions on their return in the less leisurely period of the early Japanese threat, and training for the assault on Lae.
Malaya and Singapore
Plans for the defence of Malaya and Singapore embraced an unfortunate paradox. Commander in Chief Far East Air Marshal Brooke-Popham, in an operation order issued in January 1941, assigned defence to the Fleet, acknowledged its absence, therefore went on to allot interim responsibility to the Air Force, acknowledged that sufficient aircraft had not arrived, therefore went on to give responsibility to the Army. The same order accurately predicted actual Japanese landing points, but instead of ordering ground force deployments accordingly, doubled back to make the fighting units responsible for defence of airfields, so hamstringing Army freedom of action for its main task 26.
AASC units in the theatre were in two distinct categories. The first was 8th Division's second and third line support which comprised 8 Div AASC commanded by Lieut-Col L.J. Byrne (headquarters, supply column, petrol company, ammunition company and workshop, less the sections remaining in the Northern Territory committed to the brigade kept back to defend Timor, Ambon and Rabaul), 8 Div Amn Sub-Park, a section each of 9 Petrol Sub-Park and 1 Field Bakery, 2/2 Res MT Coy and the AASC ambulance transport sections in 2/9 and 2/10 Field Ambulances. The second group comprised the general support units of 2/3 and 2/4 Res MT Coys, and 2/2 and 2/3 Motor Ambulance Convoys, which were employed in support of various formations throughout the theatre, according to the needs at the time. Base supply and transport support was provided from the British infrastructure drawn on by 8 and 9 Sup Pers Sects. That the 'story ... after the outbreak of war ... should perhaps be more properly called the story of the Imperial ASC’ in an RASC account of the campaign is just another of those unfortunate statements which pervade British accounts of operations involving Australian and other Commonwealth armies, and unfortunately the silence of Australian historians on the AASC's role and exploits does nothing to counter such an impression.
Although 8 Div AASC was organised initially in the conventional supply-petrol-ammunition unit model, the division's initial deployment as two separate brigade groups from Australia, and then as defence forces at Malacca and Mersing on the Malayan west and east coasts, resulted in a reorganisation into two brigade composite companies, first called 22 and 27 Bde Coys, then in October redesignated as 1 and 2 AASC Coys. Byrne was designated CAASC AIF Malaya, responsible for the full range of divisional, corps and base AASC units now deployed in the theatre. A further addition was the formation, from the existing units, of a water Transport section commanded by Capt R. Concannon, operating along the coast between Mersing, Endau, Mawai and Johore Bahru 27.
2/3 Res MT Coy was specially raised in Australia under command of Maj C.M. Black at the request of the British Government to help meet a deficiency of general transport in the theatre. As the AIF was experiencing recruiting difficulty and as the company was intended for rear area duty, by mutual agreement it was raised from the 35-45 age group, but the prevalence of members wearing World War 1 ribbons showed that many had lowered their real age to gain enlistment. It was attached to 11th Indian Division in the north and so, contrary to intention, was involved in the thick of action from the very beginning of the campaign. On 8 December 1941, the day of the landings, two sections under Capt G.A.C. Kiernan moved 3/16 Punjab Bn towards The Ledge in Kroh Force's preplanned attempt to seal off the anticipated Japanese landing and thrust south from Patani. When the battalion was being outflanked on 12 December, the spare drivers fought as infantry to help extricate the unit, which was then withdrawn in the 2/3 Coy vehicles. This supposedly rear echelon unit was the first Australian unit in ground action, the next being a similar unit, 2/2 Res MT Coy; the first infantry unit involved was 2/30 Bn at Gemas over a month later. The Company then continued its forward area operations, with elements involved in such diverse extra-curricular activities as airfield defence, vehicle-mounted machine gun patrols, operating the ferry to Penang, and at the direct request of the 3rd Corps Commander, forming an armoured car unit to counter a breakthrough along the Grik Road. The unit went on to 'support every brigade fighting in Western Malaya', attracting widespread approbation of its effectiveness and coolness under fire; its final task was to help move the main body of 8th Division over the Causeway from Johore to Singapore 28.
2/4 Reserve MT Coy was based on Singapore and, reinforced by 50 impressed trucks with Chinese drivers, operated as part of the theatre general transport pool, working round the clock delivering forward to dumps in Kuala Lumpur, lifting troops to the front, evacuating them, and finally salvaging ammunition in the withdrawal. 2/2 Res MT Coy was in direct support of 8th Division, often interchanging with the divisional companies, providing the forward link from the base to 8th Division, moving the battalions to their belated contact with the enemy in Malacca, subsequently taking over the function of 8 Div Amn Sub-Park to release it for troop carrying, then taking on this role itself for 2/19 Bn for the Muar operation, finally participating in the lifting of the Division back to Singapore 29.
Until 8 January, 1 and 2 Coys fulfilled routine duties in support of the garrison tasks of 27th Brigade at Kluang and 22nd Brigade at Mersing, seeing little of enemy action other than air attacks on their convoys. Thereafter the pace quickened, Westforce was formed with Byrne as its CAASC commanding 2 Coy, CRIASC 9th Indian Division, 45 and 53 Bde Tpt Coys. This grouping supported the fighting from Muar back to Johore Bahru, while 1 Coy remained on the east under command of 3rd Indian Corps, and 8 Div Amn Sub-Park carried out third line ammunition replenishment and troop carrying. By 31 January all units, including the ambulance and water transport ones, were back on Singapore Island and 'to this date all demands for ammunition had been met, and no ammunition had been abandoned by the AASC' 30.
Support in Malaya
Withdrawal to Singapore meant that, in the confined area, much of the AASC units had no legitimate technical employment. 1 and 2 Coys and 8 Div Amn Sub-Park hived off 3 Coy under Capt A. Mull to support 44th Indian Infantry Brigade; 2/3 Res MT Coy was shipped on the Kinta to Java, manning deck and engine room in place of the deserted crew, to join the anticipated 1st Australian Corps which was to become the core of defence when it arrived from the Middle East; part of 2/3 Motor Ambulance Convoy was embarked on the hospital ship Washui for Australia; and 2/2 Res MT Coy was allotted part of the northern perimeter of the city on the Japanese GoIf Course between Gurkha and Engineer troops. 1 and 2 Coys and 8 Div Amn Sub-Park also hived off 1 and 2 Inf Coys AASC each with four platoons, under Lieut F. Hiddlestone and Capt J.S. Millner, to form part of the scratch infantry Special Reserve Battalion with the depleted 2/4 MG Bn, as part of 22nd Brigade at Tengah Airfield, then fighting their way back to become part of the 8th Division perimeter around the west of the city. 3 Coy was disbanded, 1 Coy established a supply dump and 2 Coy an ammunition dump within 8th Division's perimeter for the anticipated defensive battle. 8 Div Amn Sub-Park kept up ammunition to the guns and infantry until two days before the capitulation, when most of its men were absorbed into the defensive line with 2/26 and 2/30 Bns 31.
This defensive line around the city, committing the ammunition-starved Japanese force to intensive fixed place and street fighting against twice their numbers, was wantonly surrendered by demoralised commanders out of touch with the capacity and spirit of their troops. After losing 191 members in action, 1,907 undefeated AASC soldiers together with the remainder of the garrison in Singapore went into unwarranted captivity on 15 February 1942.
The Island Garrisons
After the collapse in Malaya and the Philippines the only real forward area of resistance which could be contemplated was centred on Java, where the American, British, Dutch and Australian (ABDA) Command was created under Wavell, based on a cruiser naval force, two Dutch divisions and an assortment of allied army and air units. It had been envisaged that 7th and 6th Divisions now returning from the Middle East would form a pivotal element of this force, but the speed of events in Malaya left the Australian component of this force, designated Blackforce and placed as usual under British command, at the less than brigade strength of 2/3 MG Bn, 2/2 Pioneer Bn and other elements. Included was the bulk of 2/105 GT Coy under Capt C. Howitt returning from the Middle East which, with units of other arms, was reprieved from landing at Palembang for airfield defence duties, only to be disembarked instead in Java on 18 February 1942. 2/3 Res MT Coy was also added to the force after its withdrawal from Singapore, its organisation being adjusted to create a supply column for the Force. 2/105 GT Coy was used initially to defend Batavia's Kemajoran Airfield and provide transport detachments for ambulance duties then, reinforced from 2/3 MT Coy and other units, it also established a 70 vehicle troop carrying group for the reaction element of the Force concentrated at Buitzenorg. The Japanese landed from 28 February onwards and, as the Dutch resistance crumbled then collapsed, Blackforce, supported and moved by 2/3 Res MT Coy and 2/105 GT Coy, withdrew through Bandung towards Pameungpeuk on the south coast hoping for evacuation but without prospect of this or effective resistance, it was surrendered on 9 March 32.
Growing likelihood of a Japanese thrust to the south had led a year earlier, in February 1941, to plans being prepared to establish garrisons at Ambon, Timor and Rabaul for airfield defence. They were ill conceived, manned and supported, as the protests of the field commanders and events demonstrated 33, but like the decision to sacrifice Blackforce, were also essentially political decisions, made on an inadequate military appreciation and comprehension of the risk-effectiveness tradeoff. At least these mistakes might have provided lessons for later defensive actions, yet they were not taken in the following operations in Papua, where remote commanders and staffs in Australia not only had little or no understanding of conditions in the combat area, but also made no effort to see and understand them until the crisis was over.
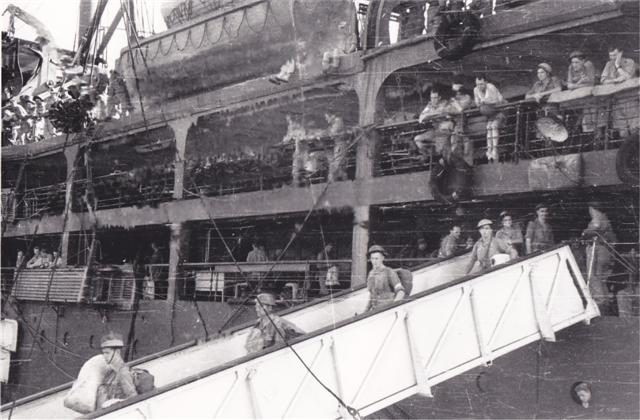
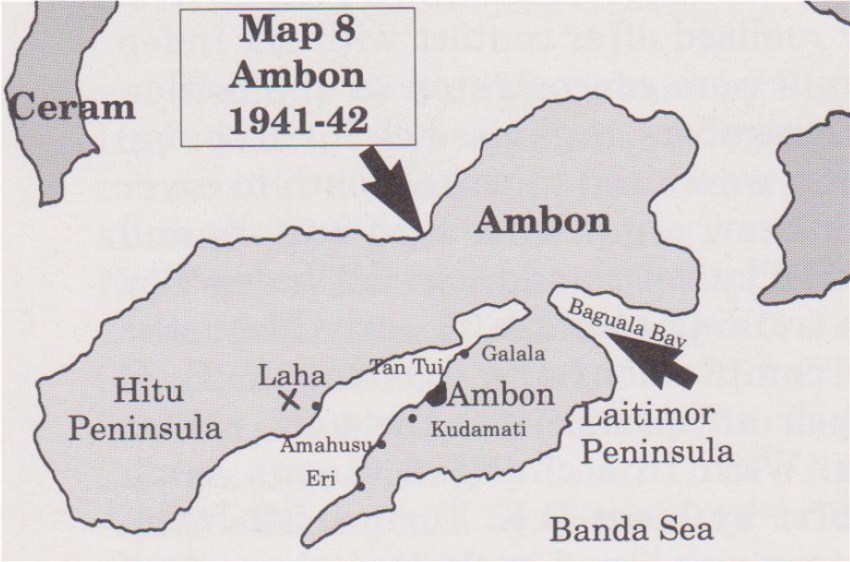
The first force, 2/21 Bn Group designated Gull Force, was landed on 17 December 1941 to protect RAAF aircraft at Ambon; the aircraft were eventually withdrawn but not their supposed protectors. The AASC element commanded by Capt J.R. Burns had been cobbled together with transport, supply, bakery and butchery elements totalling 40 members in Sydney in July, moved to Darwin and dispatched to Ambon on 14 December 1941. The main supplies and ammunition stocks were held at Laha Airfield, defended by two infantry companies, while immediate stocks, bakery and butchery were initially positioned at Galala. A Japanese landing on the north of the island eventuated on 30 January 1942, then a second landing at Baguala Bay the following day outflanked Dutch defences there, so the AASC element and its stocks from Galala, under Capt S.A. Rose, were moved to Kudamati to join the B Echelon of 2/21 Bn. In the following Japanese attack the position held out and was bypassed, but as the rest of the battalion on the Laitimor Peninsula surrendered on 3 February, those elements in the Kudimati position had no alternative but to follow suit. At Laha, attacks had begun on 31 January, with the force holding out until 2 February. The AASC element there was more actively engaged in the defensive fight – a tribute to one Dvr Doolan who was reputed to have successfully ambushed three truckloads of Japanese appears in Chapter 20; Capt Burns and other members were missing at the end of it. After the surrender in both areas, half of the AASC detachment was taken prisoner, the remainder being battle casualties or beheaded by the Japanese after capture 34.
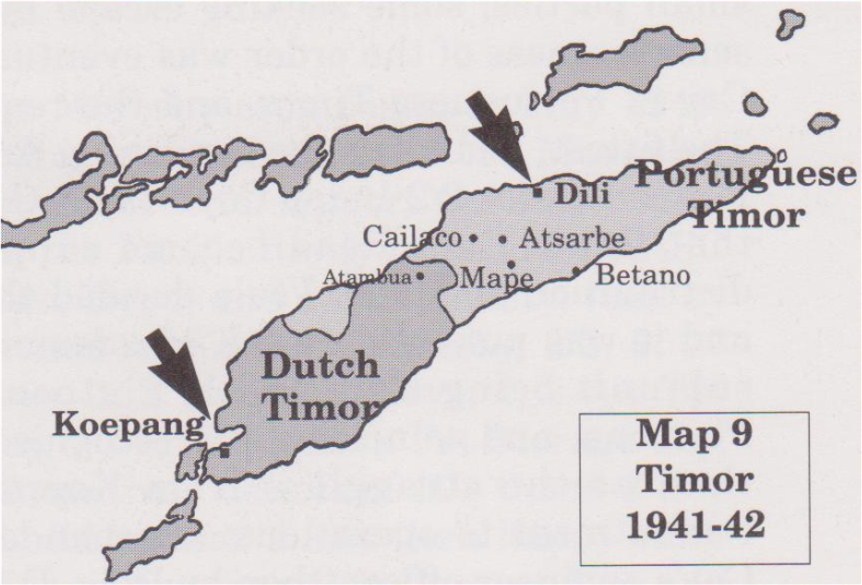
A parallel Sparrow Force, comprising 2/40 Bn Group, was dispatched to Timor to protect the airfield used to stage aircraft to Java. The force landed at Koepang on 14 December 1941 and a detachment based on 2/2nd Independent Company was then sent north to Dili in Portuguese Timor. The AASC Sparrow Section comprised a 42-strong supply and transport detachment formed in Sydney in July 1941 by Capt J.F. Read, moved to the Northern Territory, and embarked for Timor on 7 December 'with much enthusiasm' after three and a half months of fatigue duties and training at Darwin and Noonomah. In view of the precariousness of the defensive positions Read was obliged to effect a supply plan based on a series of dumps, the establishment of which occupied the detachment until the invasion. Following their quick success at Ambon, the Japanese moved on to Timor, landing at Koepang and Dili on 20 February 1942. While 2/2 Indep Coy extricated itself inland, the landing force in the south trapped 2/40 Inf Bn against a blocking force of paratroops and, cut off from its supply base and short of ammunition, it was forced to surrender.
After this surrender, newly arrived Sparrow Force commander Brig W.C.D. Veale moved his headquarters north towards Portuguese Timor with a guard of AASC members and walking casualties. On 1 March, after receiving advice of a Japanese approach, he ordered every man for himself, Read distributed the remaining rations, and the 250-strong survivors broke up into small parties, some seeking escape by sea, others overland to the north. The senselessness of the order was eventually realised after contact with 2/2 lndep Coy in Portuguese Timor, and the remnants were concentrated on the border. The fittest, including the remaining AASC members, organised as K (Koepang) Platoon under 2/2 Indep Coy's Lieut C. Doig, were used to patrol south to cover that flank. Capt Read became supply officer, organising food supply and distribution at Mape. Veale decided that K Platoon should join 2/2 lndep Coy and it was put into a week of commando training at Mape in early May, the sub-unit being renamed D Platoon to complement the existing A, B, C Platoons, and coincidentally recognise their acceptance into the unit, rather than as the stragglers from Koepang. With this changed status came commitment to operations: commanded first by Lieut D.K. Turton, 2/2 Indep Coy's engineer officer, then by Doig. D Platoon was based in the Atsarbe area of the arc which the Company strung around the Japanese forces based on Dili. It saw continuous action, first three months of successful aggressive raids and ambushes, then from August as reinforced Japanese took the initiative, in defensive operations culminating in their evacuation to Darwin on 11 December 1942 35.
An initial 25-man supply and transport unit drawn from 8 Div Sup Coln and designated AASC Rabaul was lodged at Rabaul in May 1941 to support the 2/22 Bn group known as Lark Force; also included was the AASC transport element of the detachment of 2/10 Fd Amb. The prospects for this force were as bleak as those of the sister battalion groups at Ambon and Timor, however the opportunity for the type of resistance offered in the latter was negated by lack of preparation. Although the AASC detachment commander Lieut R.I. Allen proposed to HQ 8 MD at Port Moresby that he cache supplies and ammunition in the mountains it was ignored as 'defeatist', a tag which brought dismissal of the commander of the Ambon force; the only effort made was a late and too limited local one by the battalion second in command to move some part of the supply stocks at the airfield to the rear of the position.
The Japanese assault on 23 January was in sufficient strength to break resistance by the end of the day, the garrison falling back to the south without any pre-arranged escape or reassembly plan. The attackers, intending Rabaul as a main base for operations in the South West Pacific, were thorough in pursuit and elimination of the fugitives, culminating in the execution of about 150 prisoners in the Tol Plantation area. Of this group, Dvr W.D. Collins of 2/10 Fd Amb was shot twice and left for dead, but survived to join a 160-man escaping group organised by 2/22 Bn company commander Maj W.T. Owen, who got them to the vessel Laurabada organised by District Officer J.K. McCarthy and back to Townsville. A previous similar sized group led by another company commander Capt E.S. Appel included Sgt A.L. Frazer and Dvr J.C. Ross of the AASC Detachment, getting back to Cairns on another of McCarthy's vessels the Lakatoi 36. A total of over 400 escaped out a force of 1,400 which had become another dismal sacrifice of penny-packeted forces whose function had evaporated before they were attacked, but were left to inevitable defeat for political purposes on Wavell's principle of not giving up territory without a fight, regardless of the profitless losses involved.
Rabaul Evacuation
Defence of Papua
Buildup of a military base in the Port Moresby area began in May 1940. Included in this was an embryo unit designated AASC Port Moresby, comprising a small supplies and transport element to support the small force allotted. This grew after Japan's attacks in the Pacific firstly to an HQ CAASC NG Force with 9 Coy, 141 GT Coy, NGF Base Depot and 13 Fd Bakery, then by a year later to a DDST on HQ NG Force and ADST Port Moresby, 2/2, 9, 25 Coys, 2/102, 2/105, 2/106, 141, 152 GT Coys, 1, 2 Pack Tpt Coys, 1, 2 Air Tpt Sup Pls, 2/1 MAC, 2/3 DID, 15 Sup Dep Coy, 2 BIPOD, 1 Bulk Pet Storage Coy, 2 Farm Coy, with HQ Comd 11 Div AASC and rear details of HQ Comd 3 Div AASC also in place by early 1943 37.
The build up was a less than happy story during 1941 and 1942, until the imperative of Japanese landings at Lae and Salamaua on 7 March 1942, Finschhafen on 10 March and Gona on 31 July, followed by the thrust through Kokoda towards Port Moresby, forced a change from the tropical ennui of both Administration public service and base military command – the former replaced by the military Australian New Guinea Administrative Unit, the latter by Headquarters New Guinea Force. The effect of the Japanese attempts on Port Moresby and Milne Bay was to galvanise Land Headquarters into pouring increasing supply, transport and construction effort into the bases in the all too familiar pattern of post-trauma oversupply. In consequence, while the force was starved of basic needs in the early critical period, over the following two years when the threat had subsided and operations moved to the north coast, an unnecessarily large component and installations were retained in a base which became progressively less used as ships resupplied direct to bases on the northern coast and islands.
The Japanese thrust from Buna made first contact with 39th Battalion on 23 July 1942 at Awala, pressing on through a strong rearguard action to take Kokoda and its only forward airfield on 10 August. From there the advance continued until, opposed by an effective brigade position at Imita Ridge and having outrun its supply line, the enemy force was stopped and then made a clean break in withdrawal on 27 September. Loss of the Kokoda airfield had earlier meant a similar crippling resupply situation for the two defending Militia battalions, then for the two AIF brigades rushed in piecemeal to stem the advance. While insertion of fresh units was necessary to replace exhausted and broken battalions, they simply added to the difficulties of maintenance over a single foot track through the mountains, so it was not until the defence was pressed back to the southern end of the Kokoda Track that it could receive reliable resupply, and the problem was inherited by the invaders.
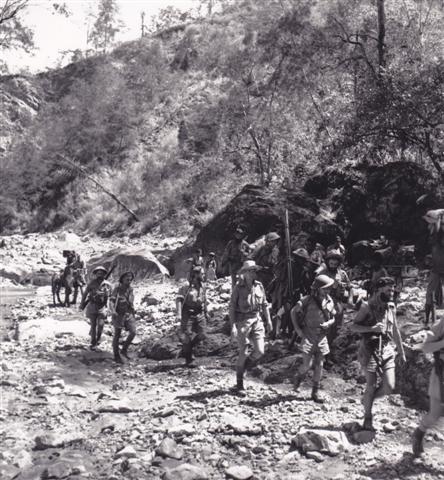
The Track was 80 km from the roadhead at Ower's Corner to Kokoda, but this was best measured as eight days walking time. Initial deployment of 39th Battalion forward of Kokoda was supported from supplies landed at Kokoda, then delivered forward by native carrier lines organised by ANGAU. In the withdrawal after loss of the airfield, when the three battalions of 21st Brigade were moved forward over the Track, the available carrier line capacity which could be recruited locally was completely inadequate for even rudimentary maintenance of the units. Expedients were tried at various stages of the route to provide alternatives. New Guinea (1st) Independent Light Horse Troop was put together by AASC horsemen mustering local horses and brumbies to cover the first leg, but could not negotiate the steep mountainsides and steps forward of Uberi. Attempts to air drop supplies and ammunition on to the dry lake beds at Myola were limited to mostly free drops by both shortage of parachutes and aircraft, and eliminated by withdrawal past the area. New Guinea Force Commander Maj Gen Morris, an ex-DST, in the early stages was given one or two aircraft on odd occasions, told that there were only 30 transport aircraft in Australia; asking for merely two on line, he might well have then asked what battles were going on in Australia which had priority over the defence of the Port Moresby base so desperately wanted by the Japanese 38.
During the withdrawal phase there was essentially no effective supply system, which did little credit to either the planning or the general and supplies and transport staffs. While Lieut Edwards of New Guinea Force AASC at Myola was doing his level best to control the supply situation forward, he was not informed of the incoming 21st Brigade and was demanding support for the existing two battalions only; as well much of the supplies sent by air from Port Moresby simply did not arrive at Myola, being either dropped in the wrong place or jettisoned without advice to New Guinea Force which consequently did not comprehend the seriousness of the shortages forward. To restore the position a 2/4 Coy detachment under Sgt Chesterman and Brigade AASC Officer Capt G.J. Hill were sent in to take control on 23 August.
Organisation and response along the Track behind them was even more chaotic: failure of these elements to show the initiative, inventiveness, and spirit of service at any price which was the usual hallmark of the AASC comes largely down to the fact that odd individuals were sent in, accompanied by an assortment of untrained helpers, and without a unit or headquarters controlling either their activities or the line of communication as a whole. Lieut H.T. Keinzle of ANGAU organised the carrier lines, a few supplies personnel organising the dumps established at the staging posts. This changed as a new attitude was instilled into the support structure by HQ 7 Div AASC taking control of the Track on 10 September which, together with its 2/4 Coy and other elements, began to give some form and reliability to the system. From Base Supply Depot Sogeri and Ilolo a platoon of 2/5 Coy delivered by 3 ton truck to Newton's Depot, then by 2/4 Coy jeep to Ower's Corner roadhead. From there to the valley floor .5 km was covered by flying fox, then 1.5 km by NG LH Tp, then carriers forward of Uberi. An officer of 7 Div AASC was located at each depot in the way stations along the Track, and members of 2/4 Coy augmented then replaced the New Guinea Force members who had been established to cope with two battalions and had to cope with two brigades.
Kokoda Track Supply Line
In October 1 Pack Tpt Coy arrived and operated from Ower's to Imita, including establishing a flying fox over the flooded Goldie River. As the advance pressed on, carrier lines delivered bare essentials forward until dumps from air dropping could be established successively at Nauro, Menari, Efogi and Myola. Alola provided little capacity and it was necessary until Kokoda was retaken for infantry to supplement the carrier lines in getting supplies and ammunition from Myola forward. But when Kokoda was secured on 2 November, first air dropping then air landing allowed delivery of requirements direct and the Track was superseded as lifeline to the force, although the depots had to be maintained for several weeks until 600 sick and wounded at Myola had been evacuated. A depot was established at Kokoda and resupplied by air landing, but forward operations to the original contact point at Wairopi over the following fortnight had to be supported by carrier line supplemented by air drops to supply bases every few miles on the way, 2/4 coy eventually operating 16 depots simultaneously between Uberi and Wairopi. This sequence was repeated at Popondetta where development of an airfield enabled air landing of stores and subsequently, in improved terrain, 3 ton trucks along the Sanananda Track and jeeps on the Soputa-Jumbora track greatly curtailed the need for carriers. However operations forward still needed air supply, and with the primitive dropping methods used, the percentage of recoveries was variable and potential for damage ever present: every round of small arms ammunition had to be gauged in the chamber of a Bren gun by the AASC ground parties, before issue to ensure that they were undamaged, and other natures of ammunition inspected and repaired if possible 39.
As part of the defence of Papua a garrison based on 7th Brigade Group was located at Milne Bay in July 1942 to protect airfields being constructed there and to secure it from use as a base against Port Moresby. At increasing threat brought reinforcement by 18th Brigade and Headquarters C Force to command the garrison. On 25 August it was attacked by a Japanese marine assault force which advanced as far as the No 3 airfield at the head of the Bay before being driven off, the remnant evacuated by 7 September. Maintenance of the force was to be by the US Army Service of Supply, which in practice unloaded supplies direct to a depot operated by Maj H.C. Snell's 25 Coy which then issued to all units, Australian and US, army and air force; ammunition and fuel were held in dispersed dumps, unaccounted for, unprotected and in unknown quantities. Formation of HQ AASC C Force commanded by Lieut-Col C.M. Walker ex-CAASC 1st Division, with 2/2 and 2/6 Coys provided the control and wherewithal to get this operating effectively in time for the battle, during which 25 Coy was included in the final defensive positions behind No 3 airstrip. At the end of the year C Force became 11th Division, its AASC headquarters redesignated HQ 11 Div AASC with Lieut-Col J. Talbot taking over as CAASC, but it was shortly removed to Port Moresby garrison and replaced by 5th Division. Thereafter the units grew to HQ Comd AASC 5 Div, 2/6 Coy, 1 and 2 Sup Dep Pls with 27 Coy (later redesignated 154 GT Coy) replacing 2/2 Coy. Milne Bay Base sub-Area units were expanded to 3 BSD, a section of 1 Fd Bch Pl, 2/2 Fd Bakery, 2 Bulk Pet Storage Coy, 3 BIPOD and detachment of 3 Pack Tpt Coy. This extended occupation resulted in extensive construction of roadways, a light railway for the BIPOD, and storage and accommodation facilities which reached a reasonable standard at about the same time as the significance of the base waned in 1944 40.
A second enemy assault seemed imminent in April 1943 but was forestalled by the naval battle of the Bismarck Sea. The area had meanwhile become a mounting base for offensive operations. A small supplies detachment supported deployment of 2/12 Bn and subsequently US forces on Goodenough Island, and further afield port facilities were established for the seaward support of the counter-offensive through Kokoda which flowed through to the recapture of Gona-Buna-Sanananda. A forward base including 5 BSD and detachments of 2/106 GT Coy, 3 BIPOD and 2/2 Fd Bakery had been set up at Oro Bay in November 1942 to support both the airfields at Dobodura and the US 32nd Division's attempts on Buna; and after the latter's capture by 18th Brigade, a port was established, cleared by 151 GT Coy, to support operations against Salamaua and later Lae. These bases were taken over by 11th Division in August 1943 as it relieved 7th Division at Dobodura. Lieut-Col E.L. Smith became CAASC the following month, having at his disposal for the Dobodura-Buna-Oro Bay areas 2 Air Maint Coy, 2/106, 158, 162 and 165 GT Coys, 23, 31 and 34 Sup Dep Coys, 3, 53 and 54 BIPOD Pls, a detachment of 2/2Fd Bakery and 66 MAC Pl 41.
Before this the continuing thrust of 7th Division from Kokoda to the coast had slowed then stopped in bitter fighting at Gona and the Sanananda Track. Gona was taken lO-December 1942, Sanananda not until 14 January 1943. After the US 32 Division's failure at Buna, 18th Brigade from Milne Bay was brought in to finish the job by 2 January 1943; the price was the extinction of four brigades as a fighting force and their withdrawal to the Atherton Tableland for recuperation and rebuilding. These operations had continued to rely heavily on air support, which was progressively facilitated by establishment of the air base at Dobodura and increased availability of DC-3 aircraft; opening of coastwise support from Milne and Oro Bays also helped in the final stages against Buna and Sanananda 42. A new approach to resupply of forces had evolved from the Kokoda Track’s reactive, emergency nature of throwing in whatever could be found and using any and all expedients to maintain the forces involved. Thereafter geography still precluded any text book solutions and continued to demand initiative, expediency and use of all available resources and systems of supply and movement, but an operating pattern emerged which fitted the environment. Instead of the composite arrangement which was evolved for North Africa and Europe, the Tropical system accepted the almost total lack of roads and worked on a system of dumps from which delivery was made by truck, jeep, trailer train, air, water, animal and carrier transport.
The general grouping was therefore based on supply depot platoons to hold stocks and man dumps, and transport platoons for base and forward delivery work. To this was added air maintenance and pack transport units, with supply depot, transport and air maintenance company headquarters where required for control. Carrier lines were provided by ANGAU, riverine and coastwise transport by the Navy, RAE (Transportation) watercraft and AASC DUKWs. The spartan levels of support and reduced use of commodities and vehicle movement which were either required or possible in these operations had meant that a large part of divisional AASC units had no place and were employed in other areas on general tasks. This system was later to be recognised in the jungle division establishments with half the previous manpower, and employed with infinite variations to suit local requirements as operations moved on to retrieving New Guinea.
Reconquest of New Guinea
With recapture of the Buna-Gona area the strategic objective of securing Papua from use as a base against Australia was effected, and the next phase was to secure airfields for use in operations against Japanese forces in the Philippines and Rabaul. The first move in the reconquest of New Guinea was the attempted thrust from Wau to Salamaua to tie up enemy forces. A small raiding group called Kanga Force was based at Wau in the Eastern Highlands in April 1942 to operate against Lae and Salamaua, but its depredations drew a countermove by the Japanese to Mubo. This caused the force to destroy the facilities, stores and vehicles at Wau and Bulolo, unnecessarily as it turned out, exacerbating future maintenance problems, particularly with the priority given to the parallel operations on the Kokoda Track.
Although there were airstrips at Wau and Bulolo, it was decided to attempt an alternate water-road crossing by driving a road through the divide from the Lakekamu riverhead in the south to Wau on the north side of the range. AASC support was controlled by DADST Bulldog L of C Area who had detachments of 15 Sup Pers Coy and 2 BIPOD to support the southern base. Detachments of 1 and 3 Pack Tpt Coys, which became increasingly surplus as the Kokoda operation concluded, were allotted as part of the construction workforce. The route finally consisted of small ships from Port Moresby to Terapo, rivercraft to Grim Point, tramline to Bulldog, and vehicle to Wau via Edie creek. The first jeeps left Wau on 23 August 1942 and, a similar convoy left Bulldog the following day, with a potential capacity of 8 tons per day by jeep and a development potential of 250 tons per day if upgraded to 3 ton vehicle level. However capture of the port of Lae the following month rendered this route irrelevant. Authorised by Blamey in December 1942 for completion in April 1943 when it would have been valuable in operations from Wau to Mubo, Salamaua and Lae 43, its continuation up to the time of the capture of Lae was an expensive waste of effort, and an indication of the excessive resources which had accumulated in the Port Moresby area.
Wau-Bulolo Road
From 14 January 1943 17th Brigade Group began to fly into Wau to match Japanese reinforcement of the Huon Gulf area. The enemy's concern on the threat to Salamaua led to an attempt on Wau airfield, which was beaten off by flying troops in to the airfield in the thick of the battle. On the night of 29/30 January before these reinforcements arrived, when two resident battalions' covering positions had been broken, all available forces including the transport detachment were formed in a tight perimeter around the airfield lifeline, reinforcements flying in the following morning. But by 6 February the attack was broken and 17th Brigade took up the offensive towards Mubo. Resupply remained dependent on air landing at Wau and Bulolo, air dropping to forward positions, and carrier lines for collection and distribution of air drops, so air superiority became of paramount importance in maintaining the aerial lifeline. There was, however, some limited scope for jeep traffic on the roads in the Bulolo valley, and some of the civilian vehicles damaged in the previous year's scorched earth effort were recovered and put into operation. After a decision to threaten Salamaua to fix enemy forces there and so weaken Lae in preparation for its capture, Headquarters 3rd Division took over Kanga Force. Its buildup at Wau included an advanced HQ Comd 3 Div AASC under Lieut-Col L.C. Page, 1 Comp Pl of 2/2 Coy, detachment 152 GT Coy, 1 Sup Dep Coy, a section of 3 and all 4 Sup Dep Pl, and detachment 13 Fd Bking Pl; this was augmented as operations developed with 18 and 2/34 Sup Dep Pls. Rear HQ at Port Moresby controlled the remainder of the divisional AASC, sent forward reinforcements and assisted resupply movement 44.
When 15th Brigade arrived and entered the battle in early June there were two axes: Wau-Mubo-Komiatum and Bulolo-Misim-Bobdubi, with the additional liabilities of independent and other companies operating near the coast and along the Wampit River to the Markham at Nadzab, then a landing of 162nd (US) Regiment at Nassau Bay at the end of June. Maintenance of the units forward was based on FSDs and FADs resupplied by jeep towards Mubo and air drop at Missim, with forward deliveries by air drop and porter. The Markham area was supplied by air drop at Zenag, 3 Pack Tpt Coy delivering part of the way forward to carrier lines. All supplies were air lifted from Port Moresby until a trickle started to come over the Bulldog road in August, at which stage a partially successful attempt was made to release aircraft from air supply for the planned air assault at Nadzab, the eastern supply route switching largely to native carriers resupplied from watercraft landing at Tambu Bay after its capture by the US regiment. Rear HQ CAASC was established at Bulolo, with the forward HQ following the slow advance, and eventually transferring to Tambu. In this final phase DIDs located at an air dropping ground, with covered storage for supplies and ammunition, were established at Dobdubi for 15th Brigade and Komiatum for 29th Brigade (which had replaced the 17th), acting as bases for the final thrusts which captured Salamaua on 11 September 45.
The major operation in finally breaking the Japanese hold on New Guinea was the capture of Lae, held by XVIII Army, the conqueror of Malaya nearly two years earlier. This was to be followed inland by clearing the enemy from the Markham and Ramu Valleys and capturing Madang, and a parallel move around the coast to clear it of enemy and link with a US landing at Saidor to seal off any withdrawal. The plan for destruction of the enemy in Lae was for a triple thrust – one from 7th Division air landed at Nadzab, a second from a 9th Division amphibious landing to the east, while 3rd Division tied up as great a part the enemy force as possible by pressing at Salamaua. On 4 September 9th Division landed 20th and 26th Brigades on the coast 25 km east of Lae followed a day later by 24th Brigade; on 7 September 7th Division began air landing at Nadzab following capture and clearance of the airfield by US paratroops.
On the first day of 7th Division's landing, part of 2/102 Comp Pl was inserted to open airhead depots as a base. 25th Brigade began the advance on Lae, drawing on these depots, until the rate of progress required the fly-in of 6 Sup Dep PI to establish depots every few kilometres, from which units drew. In the absence of unit or AASC transport these depots had to leapfrog each other to stay with the forward units and always keep a supply and ammunition point open for issues. A dozen jeeps and trailers of 153 GT Coy flown in on 8 September to keep these depots resupplied from the airhead were augmented over the following week with an additional 28, but many of these became dispersed on casualty evacuation and assisting the brigades forward. The heavy call on the drivers and vehicles for 24 hour operation was countered by establishing a maintenance squad which serviced and carried out necessary running repairs on each vehicle daily, releasing exhausted drivers for rest and also ensuring that vehicles did not suffer the same problem 46. The shortness of both the action and distances moved had allowed this shoestring of supplies and transport resources to get away with what might otherwise have been a large and slow build up which in turn would have slowed up the thrust as had happened in 7th Division's advance to Kokoda and the coast a year before. This system lasted the ten days required, but then the main body of 2/2 Sup Dep Coy and 153 GT Coy had to be phased in for the following Markham and Ramu Valley operations.
Support of 7 Div assault on Lae
9th Division's sea assault to the east had been almost copybook, an event enhanced by the lack of opposition. AASC units and supplies arrived at the main Red Beach on tank landing craft and ships from an hour and three quarters after the initial assault, the first vessels being unloaded rapidly, the later wave held up for lack of unloading manpower, as mechanical handling equipment was virtually non-existent. The advance of 24th Brigade along the shoreline towards Lae was hampered successively by the Buso, Burep, Busu and Bumbu rivers, which also posed a barrier for the following AASC units. Engineers bulldozed a track for a few kilometres from the landing beach, but forward of that the only immediate solution to stop resupply problems holding up the advance was use of landing craft drawing on 2/6 Sup Dep Coy dumps at Red Beach and delivering to the forward units along the coast. A complicating factor intruded when 26th Brigade was swung inland up the Burep and then west to the Busu, without the benefit of the coastwise resupply option. Initially 2/156 GT Coy allotted one platoon to clear the beach, a second to deliver to forward dumps and the third for forward distribution. As the front moved westwards supply depot platoons established issue points on the beaches close to the forward units, replenished nightly by landing craft from Red Beach, with inland deliveries made by jeep over rough tracks 47.
Support of 9 Div assault on Lae
7th Division was the first to enter Lae on 16 September, just ahead of 9th Division from the east, held back for a moment by artillery fire from the latter, while an element of 3rd Division also came up from Salamaua, but the trap failed, the enemy having broken clear north across the Finisterre Mountains before it closed. The unexpectedly rapid capture of Lae had two effects – it showed that there was an alternative to the long and debilitating slogging matches which had characterised the overland reduction of the Japanese coastal enclaves in the Gona-Buna and Salamaua areas, and it incited a series of further coastwise operations which retook the Huon Peninsula in five months and then pushed on to the Sepik River. The effect on logistics was profound. Firstly there was an introduction to amphibious landings, in which the American perception was of an over-casual Australian approach of fixing problems as they occurred and ignoring logistics, bringing sharp criticism from Macarthur's staff 48. While the Australian staffs justified their approach as flexible and avoiding US over-centralisation, in the organised chaos of an opposed landing a high degree of pre-organisation was essential to minimise such fiascos as the failure to land 9mm ammunition for the Owen guns in the Finschhafen assault, a dangerous situation remedied only by a brigade headquarters standing that night in a clearing with torches pointing upwards to mark the area, and the ammunition raining down about them from Boomerang fighters. Without the experience and ultra-serious approach to detail of the US 7th Fleet and US Army Engineers Special Boat and Shore Regiments the landings could have faced real difficulties without the resources or time to remedy them which are often possible in land based operations. This experience stood in good stead for the later landings in Borneo.
The other effect was the use of landing craft and amphibians for resupply, from base sub-area to divisional maintenance area to forward distribution points, instead of the hitherto pervasive and fragile mix of air drop, carrier line and some motor tracks hewn out at enormous effort. While the forces operating in and from the Markham-Ramu valleys had to rely on the latter, the coastal fighting largely featured rapid advances and seaward outflanking movement, sustained by a plentiful array of landing craft allotted for the operational and logistic support of forces which were then the centre of activity in the Southwest Pacific. However this plenty was transitory. Departure of the airborne troops which had brought an undreamed of fleet of 300 DC-3 aircraft into the area, and the onwards roll of the amphibious effort to the US Marine and Army landings through the Marshalls and Marianas, in the Solomons, Aitape, New Britain, Manus, and Dutch New Guinea, then on to Morotai and the Philippines, took with them this array of support, leaving the Australian divisions much as they had been in late 1942 until RAE water transport units could be raised, equipped and brought on site. Paucity of landing craft and aircraft available for logistic support of their operations once again became a significant factor in the pace of advance in the final campaigns in 1945.
Six days after the fall of Lae 9th Division's 20th Brigade was landed east of Finschhafen. It was another assault landing, taking with it two weeks of stocks and expecting to be resupplied from day 5. Unloading was to be manual, infantry soldiers being detailed to provide 200 men for each of the three LSTs allotted for carriage of stores. An innovation to maintain control of the beachhead missing earlier at Red Beach was a Military Landing Officer with a control staff, which was further developed for the Borneo operations into a Beach Group. The assault wave before dawn on 21 September went well to the left of the designated Scarlet Beach, consequently the follow up waves landing in the correct place faced unexpected opposition. HQ CAASC representative Maj A.J. Overell arrived at 0600 hours, just as the beach was secured, the LCTs arriving at 0700 and being sent off within two hours to avoid air attack, one still partly loaded with the stocks of 9mm ammunition mentioned earlier. 27 Sup Dep PI established food, fuel and ammunition dumps at the beach while a detachment of 2/156 GT Coy provided the transport for beach clearance and delivery forward, though this had to be restricted to jeep traffic owing to the bad condition of the tracks. The beach area continued to be subject to bombing with consequent casualties and loss of stocks, while drivers along the tracks received the attention of snipers as they delivered replenishment to the advancing infantry units.
Increasing enemy resistance made it obvious that the brigade which had landed had bitten off more than it could chew, and the remainder of 9th Division was progressively called forward: Finschhafen fell on 2 October 1943. A divisional maintenance area with an Advanced HQ Comd 9 Div AASC was established on the outskirts of Selankaua plantation, and the Advanced Supply, Petrol and Ammunition Depots set up by 27 Sup Dep Pl were resupplied daily from Lae by landing craft across the beach, local issue points being established to service divisional troops, and forward ones for the brigades. The transport available could barely cope with the beach clearance, much less forward delivery, so half of 2/156 Coy was brought in 2½ ton GMCs releasing the overworked jeeps for forward distribution tasks. Nine DUKWs were used for inter-beach work, though Japanese aircraft and over-enthusiastic US pilots looking for enemy barges resulted in casualties and losses to the amphibians and their crews.
As the myth of the 'pushover' against 350 enemy propounded by Macarthur's headquarters dissipated against the reality of the Japanese 20th Division moving into the Sattelberg-Wareo area, depots were established by 2/6 Sup Dep Coy at Heldsbach for 20th Brigade while the issue points at Scarlet Beach served 24th Brigade. After 26th Brigade was landed in response to the enemy attacks towards Scarlet Beach and advanced along the Sattelberg track, further depots were established forward in support. The area continued to receive frequent air attack, one directly on the headquarters and depots at Selankaua. By 25 November Sattelberg had been taken, clearance of the area north was commenced, and the recently introduced 4th Brigade, then relieved by 20th Brigade, struck north for Sio, supported by beach-hopping depots of 2/6 Sup Dep coy, moved and replenished by the US 532 Engineer shore and Boat Regiment as it had done throughout the campaign. Finschhafen Base Sub-Area including 2/104 GT Coy, a detachment of 2 Air Maint Coy, 23 Sup Dep Coy, 56 BIPOD Pl, and 4 Fd Baking Coy, took over the advanced depots from 2/6 Sup Dep Coy, releasing it to its proper forward support role. Sio fell on 15 January 1944. During this whole period the vehicle drivers worked round the clock, two or three in turn to a vehicle, clearing from beach and airfield to depot, forward deliveries, casualty evacuation and assisting units which were without transport of their own. By mid January 9 Div AASC, like the Division itself, was worn down and ready for relief and refitment 49.
At Sio 5th Division relieved the 9th and drove on to Saidor making contact with the sea-Ianded 126th US Regiment on 10 February 1944. As part of the 5th Division's relief of 9th Division, HQ Comd 5 Div AASC under Lieut-Col R.D. Summerfield moved to Kelanoa on 27 January 1944, 4 Sup Dep Coy and 2 Sup Dep Pl arriving the day after; he also took command of the existing 241 and 242 Sup Dep PIs operating beach FSD and FAD at Kelanoa and providing beach depots forward to Sio West, and 39 Ind Tpt Pl operating eight DUKWs, 13 3-tonners and 25 jeeps at those locations. Significant problems were inherited from 9th Division and perpetuated by 5th Division in the propensity of the general staff to place AASC detachments under command of the brigades in whose areas they were located, so without the control and backup of the divisional AASC headquarters. There had been a marked fall off in standards: no ammunition examiners had been available at the FADs and stocks were in unknown condition – ADOS 5 Div's response to the CAASC's request for six examiners to classify all stocks was to provide one; no provision had been made for workshop support and after a DUKW foundered at sea, the better-late-than-never response was to allot a mechanic to each amphibian, courtesy CAEME 5th Division, to catch up with the backlog; and supplies commodities were badly unbalanced so restocking had to be undertaken.
The maintenance system continued to be a product of the operating environment, in which supplies were delivered by barge from Finschhafen Base Sub-Area to Kelanoa for two consecutive days, and on the third direct to the forward maintenance area operated by 241 Sup Dep Pl at Butu-Butu; a section of 4 Fd Bky located at Kelanoa supplied both local and forward beachheads. From hereon it was a repeat of the previous operations from Finschhafen, 8th Brigade's infantry advancing along the coast, 2 Sup Dep Pl and jeep/DUKW detachments of 39 Indep Tpt Pl opening coast-hopping depots, on whose arrival depended the next stage of the advance as much as enemy resistance. From Saidor, Madang lay ahead as a 5th Division task, but this had by now been pre-empted by the parallel advance of 7th and then 11th Divisions through the Markham and Ramu Valleys 50.
Support of Coastal Operations
7th Division's drive up the Markham did not have the luxury of water transport to skirt untrafficable supply routes, relying substantially on air transport and carrier lines. The general arrangement was for 2/102 Comp Pl to set up the airhead depots and 2/2 Sup Dep Coy with its 5, 6, 7, 9, 10 Sup Dep Pls operating the forward issue depots in support of the brigades and other groups and forces. 2/153 GT Coy was internally reorganised from three to four platoons, succumbing to the usual theory of divisional staffs that brigades were entitled to their own transport and supplies elements under command and an extra one was therefore required for divisional troops. Here as elsewhere they ignored the constantly re-demonstrated lesson that, unless the CAASC was given control and allowed to switch resources to the areas of greatest priority, and work to an overall maintenance and movement plan, each group had its own puddle which was alternately over-, then underemployed and there was no pool with which to respond to real areas of need and crisis. At least there was a justification for some devolution of vehicles in this campaign as brigades were without their own transport and so AASC transport detachments were flown in to forward operational bases to support them as the fighting flowed along the river valleys.
During the drive on Lae from the Nadzab, some other lesser commitments were supported by 7 Div AASC – the Papuan Infantry Battalion at Sangan resupplied by carrier line and air drop; Bena Bena Force, earlier established to keep the enemy from the Southern Highlands, came under command of 7th Division and was supplied through Garoka airstrip; Wampit Force, a 3rd Division battalion on the south of the Markham with its own 3 Div AASC element, was replenished from Nadzab by collapsible boat with an outboard motor; and a detachment of 2/102 Comp Pl formed a depot at Boana supporting a flank protection battalion. After the Markham operation got into stride following Lae's occupation, a depot set up by 6 Sup Dep Pl at Kaiapit dropping ground supported first 2/2 Cav Cdo Coy then 21st Brigade. As the advance pressed up the valley, 6 Sup Dep Pl moved forward after it as Kaiapit airstrip was opened, turning the depot over to a detachment of 2/102 Comp Pl and an element of 2/153 GT Coy which was able to get jeeps and trailers some way forward on the flat valley floor through the kunai grass. There was not, however, enough capacity to stretch forward to Gusap, and air drops were necessary until 5 Sup Dep Pl set up a depot as soon as the airfield allowed air landing.
Air supply having become a mainstay of a sizeable part of the Markham requirement, 3 Air Maint Coy took over the depot and forwarding task at Nadzab, then 7 Sup Dep Pl took on Kaiapit, releasing 1/102 to go forward to take over Gusap. The pattern then settled into 5 and 6 Sup Dep Pls moving with each brigade down the Ramu valley, operating depots at dropping grounds and moving resupply by jeep and carrier to their forward depots for issue to the brigades in the now familiar leapfrogging technique. Dumpu was reached on 5 October, and this temporarily replaced Gusap as the forward base until it was moved two weeks later to Bebei. Rear depots were progressively closed down, the supply units brought forward, and as operations became more scattered, more forward depots were opened at Kumbarum and Guy's Post for operations at Shaggy Ridge, captured on 22 January 1944, and Yogia and Evapia Rivers for final clearance operations in the Ramu valley 51.
Relief of 7th Division by 11th Division, begun before Christmas, was completed by 21 February, and the advance across the Finisterre Range began, taking Bogadjim on 13 April and culminating in the occupation of a deserted Madang on the 24th. The area was then taken over by 5th Division, which sent 8th Brigade west to Alexishafen and Hansa Bay, patrolling forward to the mouth of the Sepik River by 13 July 1944, with all Japanese formations having been withdrawn to the Wewak area. 5th Division's maintenance area was established at Madang by 4 Sup Dep Coy and part of 158 GT Coy, 241 Sup Dep Pl opening a depot at Singor in support of 4th Brigade, and 242 Sup Dep Pl similarly at Alexishafen. At the end of the operation, 5th Division' AASC was strung out across half of the north coast of New Guinea, from Finschhafen to the Sepik 52 and, in the piecemeal style of operations, had used three supply depot platoons and a transport platoon to carry the brunt of the forward support of operations. In the absence of roads along the coast, the use of landing craft and 39 Pl's DUKWs had solved a resupply problem to which the only alternative would have been air dropping. This coastwise support had been by courtesy of the US Engineers – the RAE's transportation service was not to make its presence felt in numbers for another year after the move of US resources northwards left a vacuum and a sense of urgency to get that service into effective use.
Support of Markham-Ramu
While Australian forces were clearing the central area of New Guinea, and after their own capture of Saidor, the US forces had made a further series of amphibious landings at Aitape, Hollandia, Biak, Sasapor and Morotai in the west and in an arc Manus-New Britain-North Solomons in the north and east. When these operations had achieved the objectives of securing airfields for operations to the north, and neutralisation of enemy troop concentrations was achieved, the strategic rationale for further operations in these areas ceased to exist. The remaining substantial enemy forces were isolated, struggling for survival and no threat to the airfields, but there followed a series of Australian campaigns, costly in resources and lives, in first reconquering the remainder of the Mandated Territory of New Guinea, and then the islands to the north and west, for which there was no valid place in Macarthur's strategic plan for the Philippines road to Tokyo 53.
Although 6th, 7th and 9th Australian Divisions were originally earmarked for the Philippines, the undesirability of mixed supply lines and US political resistance to a foreign troops involvement in liberating its colony, encouraged Macarthur to arrange for 6th Division to garrison the Aitape airfields, 5th Division to take over New Britain and 3rd Division Bougainville, so relieving twice as many American divisions for the invasion. These three divisions were themselves considerably stronger than the assessed requirement for garrison task, but were required by Macarthur as face saving for the large US forces replaced, and as a way of committing Australian divisions from alternatives of disbandment or being inserted into US operations; coincidently the result was the positioning of sufficient strength to undertake operations greater than simple containment of bypassed forces. In determining the posture of the troops in this arrangement Blamey passed over the options of passive defence or an all out offensive against enemy strongholds in favour of 'obtaining information, probing the enemy's positions and carrying out offensive operations with small forces with a view to seeking out and destroying the enemy where found'. It became increasingly difficult to distinguish the operations which developed under this latter option from those of the second rejected alternative, and the necessity and utility of this expenditure of lives and material resources has been the subject of considerable debate and criticism 54.
Part of these operations became the last phase of the reconquest of New Guinea in 6th Division's two pronged move from Aitape inland along the Toricelli Mountains and along the coast towards Wewak, beginning with deep patrolling from 1 December 1944. The buildup of 3rd Base Sub-Area at Aitape had commenced in mid-October before the division arrived, and included 126 GT Coy, 3 MAC Pl, 5 Port Det, 22 Sup Dep Coy with 63, 92, 119, 2/160 Sup Dep Pls, 5, 14 and a section of 7 Fd Bky Pls, 1 Indep Farm Pl and 52, 63, 69 BIPOD Pls. With no port at Aitape ships were unloaded to landing craft and amphibians, then across the open beach. During the monsoon season, to avoid being beached, the landing craft had to carry a 2½ ton truck aboard which received a load and drove off as soon as the shore was reached, culling the normal payload of the craft by 80 per cent. Difficulties in landing men, equipment and stores and an adequate margin of supplies persisted until the weather improved in April.
The Divisional AASC under Lieut-Col J. Talbot comprised HQ Comd 6 Div AASC, 2/5 Sup Dep Coy with 2/20-25, 2/35 and 2/188 Sup Dep Pls, 2/3 GT Coy with a 2½ ton GMCs and 2/155 GT Coy with jeeps and trailers. Its operations were varied by the two different lines of communication: one along the coast and foothills where the old German Road provided some trafficway, although interrupted by creeks and rivers at regular intervals; the other along and over the mountains where extension of the advance soon moved beyond the capacity of carrier lines. Maintenance along the coast followed the usual pattern of using supply depot platoons to establish dumps at road, air and beach heads, with jeep and tractor-trailer trains operating forward and native carriers bridging the gap to and within units.
On the inland route 17th Brigade could be supplied only by air, and with initially one then two Dakota aircraft which also had to meet operationally urgent demands on the coast axis, this provided bare support for even limited activities. The rear air supply function was carried out by 2/160 and 2/188 Sup Dep Pls until the belated arrival of 12 Air Maint Pl in March 1945, while at the receiving end supply depot platoon detachments and native carriers cleared the dropping grounds, distributed to sub-units and recovered scarce parachutes back to Aitape. Along the coast route 19th Brigade led the patrolling battle, relieved on 25 December across the Danmap River by 16th Brigade supported by 2/21, 2/22 and 2/23 Sup Dep Pls, which established a series of leapfrogging bases, initially at Dogreto Bay by landing craft and road, with 2/3 and two sections of 2/2 Tpt Pls from 2/155 GT Coy delivering forward to units, carrier lines bridging the gaps until jeep tracks were pushed through. 16th Brigade took over again in April, supported by 2/25 and 2/35 Sup Dep Pls and 2/155 GT Coy elements which had to operate on 12-14 hour shifts to move the tonnages required forward. CAASC 6th Division was convinced that GMCs could operate just as effectively as the jeeps in the prevailing conditions, and deliver a much greater payload, but 2/3 GT Coy was fully committed to barge unloading and getting supplies to the forward depots. Requests for relief to 1st Corps did not bring trucks, rather the arrival of 2/96 Tpt Pl with more jeeps! Limited engineer support meant that bridging of water crossings was slow and flooding destroyed bridges often before they were even completed. This, combined with the low capacity of the divisional transport and the need to use the same truck-on-landing craft system at forward beaches as at Aitape, meant that any significant operations were curtailed to that limited resupply capacity.
Support of Aitape-Wewak
Requests to 1st Corps for heavy transport, landing craft or aircraft to support a major thrust on either front were refused through unavailability, and with wet weather hampering air and road movement even further, the advance slowed in line with its limited supplies, particularly ammunition. The airfields at But and Dagua were not secured until 17 and 22 March, when at least air landing enabled higher payloads and reduction of the frequent losses of parachute drops falling into Japanese lines or lost in the jungle or into the sea; but no inland airfield was available until one was opened near Maprik on 14 May.
After the capture of Dagua ten LCTs and six Fairmile launches were allotted for a drive on Wewak, enabling the build up of adequate supplies, fuel and ammunition and reliable resupply. A ground and amphibious assault took Wewak, Boram and Moem on 11, 17 and 22 May. The plan was that this should have completed the campaign and allowed the objective of reducing forces in the area to one brigade; in fact the remaining Japanese who had withdrawn into the mountains were presented with an extended target in the string of airfields and the administrative areas of garrisons which had to be established right along the coast between Aitape and Wewak, and 17th Brigade still faced further resistance east of Maprik. This dispersion meant a concomitant administrative task of maintaining this extended network, so the Division was ultimately committed until the end of the war to more costly defensive operations than would have been incurred in staying originally at Aitape and reducing the garrison to one brigade.
The centre of gravity was now shifting to Wewak. To avoid reshipping through Aitape, 3rd Base Sub-Area helped man forward supplies, ammunition and petrol depots at Cape Wom, which then received direct shipments from cargo and tanker ships; the divisional FSD and FAD then distributed to units in the area. Air maintenance of 17th Brigade in the Toricellis was also moved to Wewak, 12 Air Maint Pl setting up at Boram airstrip in July, 2/30 Sup Dep Pl receiving and issuing the airdrops then air landings when Hayfield airstrip was opened near Maprik; 2/3 Tpt Pl was flown in to distribute forward. Similarly the transport effort was divided between the two centres, with 2/155 GT Coy progressively centring on Wewak 55. The period had been extremely testing on the units as they were caught in a situation where the divisional commander had wanted to drive on to take Wewak, while the higher command vacillated, withholding the necessary air and watercraft resources which would have facilitated the effort, but not giving clear orders to stop. The result was that the Divisional AASC, and the engineer construction and watercraft efforts as well, had been driven to extreme lengths to support a drawn out advance when they were manned and equipped only for a garrison role. The question of clear objectives, and of following them, had also arisen during the parallel deployments in Bougainville and New Britain.
The Island Campaigns
Operations in the North Solomons were conducted by 2nd Corps based at the American enclave at Torokina from November 1944, using 3rd Division and two independent brigades, 11th and 23rd. The specific purpose was to relieve the US Army garrisons protecting airfields at Torokina on Bougainville and the Outer Islands – Green Islands, Emirau, Mono and Munda, and the Treasury Islands, however Blamey's direction of this mission extended operations towards the progressive elimination of the enemy rather than the containment policy and practice adopted by the Americans. Initially 23rd Brigade took over the Outer Islands and 3rd Division and 11th Brigade the perimeter around the base at Torokina. Ignoring the tacit truce between the US and Japanese forces, where each kept to its base areas, 7th Brigade was advanced north east along the Numa Numa Trail, then handing over to 11th Brigade. Operations on Bougainville thereafter split into three sectors: 23rd Brigade was brought in from the Outer Islands relieving 11th Brigade in the east towards Numa Numa; 11th Brigade was allotted offensive activity to the north, later relieved by 23rd Brigade; and 3rd Division was pushed south towards Buin with successively 29th, 7th and 15th Brigades 56.
Support was centred on 4th Base Sub-Area at Torokina which inherited substantial supply, refrigeration, fuel storage, port and road facilities set up under the generous resources available to an American base. The units deployed from October 1944, fortuitously in before the brigades to be supported, included 129 and 133 GT Coys, HQ 2 BSD, 30 Sup Dep Coy with 45, 136, 146, 226 and 237 Sup Dep Pls, 13 Fd Baking Coy, 53 and 54 BIPOD Pls, 6 and 7 Indep Farm Pls and 1 Marine Food Sup Pl. The supply units held reserve and maintenance stocks, distributing to the three sectors on Bougainville and the Outer Islands under the direction of DDST 2nd Corps. As no air maintenance unit had been allotted to the campaign, an ad hoc air maintenance platoon was made up from 121 Sup Dep Coy and 23rd Brigade's 40 Tpt Pl. The transport system was essentially 2½ ton vehicles on roads to units near Torokina, jeep and trailer on tracks further on, then jeep trailer trains drawn by tractor in the less trafficable tracks; alternatively water transport was used as substitute or supplement for coastwise movement, air drops for inland movement; from jeep, water and airhead native carriers bridged any gap to units.
The infantry battalions, then companies in the Outer Islands, being simply static protective troops with no authorised operations, had supply detachments and 30 days stock replenished from Torokina by sea. In the Eastern Sector towards Numa Numa 222 Sup Dep Pl established a DID 22 km inland in the mountains from which native carriers operated up to the crest of the range at Barges HilI and forward, then later jeeps and trailers of a platoon of 158 GT Coy were hauled up the range to operate the link forward of it; air drop met operationally urgent needs. The sector was taken over briefly by 11th Brigade, 223 Sup Dep Pl relieving 222; 23rd Brigade then took over the area and 244 Sup Dep Pl the DID; a light railway was installed from the roadhead to Barges Hill, replacing the native carrier link to the jeep track forward.
In the Northern Sector 11th Brigade moved north along the coast to clear the Soraken and Bonis Peninsulas. Small ships from Torokina delivered to a series of 222 Sup Dep Pl DIDs established progressively forward, culminating in establishing an FSD at Freddie Beach at the base of the Soraken Peninsula, from which landing craft delivered to a 223 Sup Dep Pl DID at Ratsua on the Bonis Peninsula, 76 Tpt Pl jeeps and carriers delivering forward. By June 1945 with the enemy bottled up on the Bonis Peninsula and operations static, 23rd Brigade took over, supported by its 243 and 244 Sup Dep Pls and 40 Tpt Pl.
In the Southern Sector a road was built parallel to the coast along the axis of 3rd Division's southward advance, a divisional maintenance area being established at Toko, maintained by landing craft from Torokina to transit facilities at Motupena, then trucked over a rough and sandy road to Toko. This maintenance area was hardly an inspired move, both in concept and in location. 3rd Division understandably wanted to divorce itself from the base at Torokina, but setting up a base, as opposed to a forward headquarters, in an isolated and restricted patch of jungle on a surf beach caused unnecessary double handling and over-use of resources by splitting the available supplies units – building up to HQ 131 GT Coy, parts of 54, 66, 67 Tpt Pls, 131 Wksp Pl and 3 Sup Dep Pl at Motupena, with HQ 152 GT Coy, 53, 54,56 Tpt Pls, 152 Wksp Pl plus 224 Sup Dep Pl and 11 Fd Baking Pl at Toko. Each held and moved substantial overlapping and therefore unnecessary stocks of food, fuel and ammunition: the very valid technique developed early in New Guinea of setting up dumps wherever required was progressively extended to putting them everywhere, and stocking them as if the base area were two weeks rather than a day away. 227 Sup Dep Pl had remained at Torokina to man the Perimeter DID for the left-out-of-battle elements of 3rd Division, so 11th Brigade's 223 Sup Dep Pl was brought in to take over Motupena DID, relieving 19 for employment forward. The remaining supply depot platoons – 4, 18, 19 – operated forward, supplying the brigades from a series of DIDs which were leapfrogged behind the advance of the roadhead, the trucks of 152 GT Coy and coastwise craft replenishing them; sections of the transport platoons' jeeps and trailers and native carriers moved in front of roadhead to the brigade unit echelons; and air drops resupplied detached elements, delivered high priority stores and filled in when weather disrupted road movement, averaging a high five sorties a day which indicated that some problems in the routine system were being covered as emergency deliveries 57.
Support of Bougainville
After hostilities ceased 2nd Corps still faced about 30,000 enemy, having engaged in an arduous, expensive campaign plagued by shortages of watercraft and adverse terrain and weather. An infrastructure had to be established to support an inconclusive and unnecessary result, requiring a large investment in supply, transport and construction units, which themselves created their own overheads. The other quite satisfactory option adopted by the US forces had been to fulfil their mission by a defensive perimeter around Torokina and in the Outer Islands, on an interior and therefore very economical support system, but opportunity and an oversupply of combat units drove 2nd Corps into offensive action, in something of a parallel to Palestine in World War 1. Macarthur would not countenance the embarrassment of Blamey's proposal for Australian brigades or battalions replacing his American divisions, so with the excessive and confident force available, offensive operations were an option, and the urge to apply a large offensive military machine to the purpose for which it was designed won out. It was a repeat of the Aitape-Wewak operation, and of one also going on more tentatively in New Britain 58.
When 5th Division took over from the US division garrisoning the western half of New Britain it inherited and broke a similar tacit non-aggression stance as had been in effect at Aitape and Torokina. Its directive was active defence, but while there was forward offensive movement which the US forces had found quite unnecessary, the ultimate folly of assaulting Rabaul was avoided. The first elements of 5th Division landed on 5 November 1944 at Jacquinot Bay to establish a new base, 14 Sup Dep Pl accompanying the first battalion group to land in a disorganised and fortunately unopposed landing, for which RAAF's 'maximum effort' was one bomber, arriving late. Lodgement of 5th Base Sub-Area a week later built up to 165 GT Coy, 31 Sup Dep Coy, 68 BIPOD Pl and 10 Fd Baking Pl plus a section of 8 Fd Baking Pl, 2 Indep Farm Pl, 4 Marine Food Sup Pl and a section of 5 MAC Pl. The divisional AASC under Lieut Col E.L. Smith eventually built up to HQ Comd 5 Div AASC, 4 Sup Dep Coy with 1, 2, 14, 15, 250, 251 Sup Dep Pls; 154 GT Coy of 52, 55, 88 Tpt Pls and 154 Wksp Pl. This build up, slowed by the same shortage of shipping and landing craft which followed the departure of US forces from the other garrisons at Aitape and Torokina, was not completed until February 1945. A battalion group had also relieved a US garrison on the north side of the island at Cape Hoskins on 8 November, accompanied by A Sec 14 Sup Dep Pl, augmented later by a detachment of 55 Tpt Pl.
Formation of a new base produced an overload on the Advanced Supply Depot operated by 31 Sup Dep Coy, and it was necessary during the build up phase to attach two divisional supply depot platoons to augment it. Forward maintenance of 6th Brigade on the south coast towards Wide Bay meant that, with no roads in the area, all resupply had to be by landing craft. With this brigade isolated, CAASC placed 14 and 15 Sup Dep PIs and Det 55 Tpt Pl under brigade command; on 13th Brigade relieving 6th Brigade, 250 and 251 Sup Dep Pls and detachment 88 Tpt Pl similarly relieved their predecessors. A similar relief of 36 Bn at open Bay/Hoskins saw 2 Sup Dep Pl and a section of 88 Tpt Pl take over there, the previous detachments returning to Jacquinot Bay. As an unusual variation, maintenance of that area had not been a 5th Division or 5 Base Sub-Area responsibility, replenishment coming directly from Lae.
A significant change in the transport scene occurred with the mid-February opening of a road from base to division and forward brigade. As had been found in the other later campaigns, 2½ or 3 ton general service trucks could handle such roads as well as jeeps and trailers, and were infinitely more productive: it was only on very narrow tracks that jeeps were necessary, and in very bad going even those had to be replaced by tractors pulling trains of jeep trailers. The Jungle scale for transport platoons meant jeeps and trailers, and 154 GT Coy was Jungle. With the new road plus the withdrawal of most of the landing craft in March over to Aitape for the drive on Wewak, the demand for vehicle transport had escalated to a level where jeeps could not cope. Early output figures had shown that, while the percentage of 3 ton vehicles used was 7.5 per cent, they had in fact moved half the tonnage lifted. Fortunately most of the platoons had been converted to Jungle scale after arrival at Jacquinot Bay, and the 3 ton vehicles were still available to be taken back into service. It was a lesson learned, but it had been learned earlier on several occasions in New Guinea, and the blind following of establishments should neither have been proposed nor implemented 59.
A lesson which was recognised in this campaign, though not implemented in the remaining ones, was that opening divisional FSDs and FADs in proximity to depots run by base sub-areas just because divisional AASCs were supposed to operate them was wasteful, doctrinaire nonsense. The whole ethos of the jungle organisation and method of operation was to run on spartan lines and tailor each solution to the actual problem, but wooden headed staffs, both service and general, persisted in repeating what they had learned elsewhere rather than thinking the problem through. This duplication of facilities was a problem at Gallipoli forty years before, and it died hard. The unfortunate fact is that logistics is not among the courses conducted at Australian Army schools and few officers understand logistics, using rote learning or repetition of their limited earlier experience to guide their actions. What experience did carry over from this war largely died out in the postwar years and this particular wheel had to be reinvented after several years of misapplication in another theatre over twenty years later.
Operations in New Britain moved on spasmodically, the 'offensive spirit' directive urging commanders forward, orders to stay away from Rabaul and deliberately restricted resources holding them back. A transport and a supply depot platoon were rotated through forward support duty at Tol Plantation as the line was stabilised at the neck of the Gazelle Peninsula until the war closed. It was as well that adventurism was held in check, as the estimated 30,000 enemy facing the two-brigade Australian division turned out to be three times greater, comprising the equivalent of five divisions, and pressure had begun to mount as the advance had threatened what they had regarded as their sanctuary 60.
Further around the Island chain, part of Morotai had been retaken by a US Army amphibious landing as one of the potential bases for operations against the Philippines. As it now became the base for Australian operations in Borneo and possible further ones in Java or Malaya, the island became the home for an uncomfortable cluster of static and transiting headquarters – those of Blamey's Advanced Allied Land Force which Macarthur no longer recognised other than for Australian units, 1st Corps, 7th Division, 9th Division, the beach groups and 1st Base Sub-Area. The latter command included HQ Comd 1 BSA AASC with 2/102, 2/105 GT Coys, 50 Tpt Pl (DUKWs), 6 BSD, 4 Bulk Pet Storage Coy, 51, 65 BIPOD Pls, 2/1 Field Bakery and 1 Ref Plant Op PI 61. Of six planned amphibious assaults three were finally confirmed: Oboe One (Tarakan), Oboe Six (North Borneo) and Oboe Two (Balikpapan). While there was a substantial obligation and justification to regain the territory and liberate the population in Australia's territories in New Guinea, the Bismarck Archipelago and the North Solomons as the Americans were doing in their Philippines colony, the landings planned against the bypassed Japanese forces in Borneo were not nearly so well justified, leaning rather on a desire to give two Australian divisions the active task denied by their exclusion from the invasion of the Philippines.
From an Australian logistics viewpoint they represented the most ambitious commitment in the South West Pacific since the attack on Lae: the AASC troops were not as numerically great as those assembled for mobile operations for the Australian Corps in the Middle East but they had finally not been committed to operations. For the Borneo operations supplies and transport support was split between three echelons – the normal divisional AASC units which at supplemented jungle scale now comprised two general transport companies and a supply depot company, plus the division's slice of specialist corps troops; a beach group which received the maintenance and buildup supplies until the base units could be established; and a base sub-area which also absorbed the beach group transport, rations, ammunition and fuel supply units into its structure when it could be landed.
The Oboe One assault at Tarakan by 26th Brigade Group of 9th Division was launched on 1 May 1945, with the primary mission of securing an airfield to support the later Oboe landings 62. It was the smallest of the Oboe operations and something of a test bed for the larger ones to follow: divisional troops comprised the Brigade Group's HQ 1 Air Maint Coy which also doubled as HQ AASC Oboe One commanded by Maj C.W.W. Perry, 11Air Maint Pl, 51 Tpt Pl and 246 Sup Dep Pl with additional 9th Division units 2/30, 2/31 Sup Dep Pls, 2/15 and detachment 2/18 Tpt Pls; the 2nd Beach Group’s 2/108 GT Coy, 235 Sup Dep Pl and 58 BIPOD Pl; and 1st Base Sub-Area 2/3 Fd Bking Pl, 64 BIPOD Pl, two sections of 2/2 MAC and detachment 4 Bulk Pet Storage Coy which were phased in after the landing had been stabilised. HQ AASC came ashore on the second day and established itself in the 2nd Beach Group area. Unloading was hampered by the beach approaches, LSTs initially remaining offshore with their cargo having to be lightered ashore rather than beaching and being unloaded directly over the beach. The Beach Group supplies and transport got ashore by Day 2, and on Day 3 half of the brigade supply depot and transport platoons were established; all units were ashore and stores unloading completed within two weeks. In addition to the poor beach approaches, the operation was significantly hampered by RAAF vehicles in both a quantity which showed that there was no concept of living hard in serious operational situations, and in overloading, poor waterproofing and driving which resulted in obstruction of landing and exit points. Resistance had ended by 22 June, but the difficulty experienced in reconstituting the badly damaged airfield precluded its use during either of the succeeding Oboe operations, so this operation proved to be little more than a costly rehearsal for those later landings 63.
Support of Tarakan
Oboe Six landed the remainder of 9th Division from 10 June at Brunei Bay, Labuan and Muara Islands. Brunei Town fell on 13 June, Labuan and Muara 15 June, Seria oilfield and the mainland one at Lutong were captured a week later. Divisional troops under CAASC Lieut-Col J.H. Mclennan comprised HQ Comd 9 Div AASC, 2/142, 2/156 GT Coys each of three platoons, the first of 2½ ton, the second ½ ton trucks, and 2/6 Sup Dep Coy of six platoons; 1st Beach Group including 2/166 GT Coy, 2/240 Sup Dep Pl and 57 BIPOD Pl; and 8th Base Sub-Area including 2/102, 2/106 GT Coys, the latter being equipped with DUKWs, 2/26 Sup Dep Coy, 13, 15 Fd Bking Pls, 62 BIPOD Pl, 4 Bulk Pet Storage Pl and 1 Port Det. The divisional troops were regrouped to tailor them to each landing force, each brigade group having a composite company in direct support for the landing to ensure the unity of control of the supply and transport duality in the early confused part of the operation. Three hours after the 24th Brigade Group assault wave hit the beach at Labuan 2/156 GT Coy landed with 2/28 Sup Dep Pl to open the AP, Sup P and PP for the brigade. Seven hours later 2/142 GT Coy with its transport platoons was landing to support divisional troops. 2/6 Sup Dep Coy's landing with 20th Brigade Group on Brunei was delayed until the second day, but the build up flowed after that. In the follow up waves, the bakeries were in production on Day 5, bulk storage tanks and vehicle refuelling, road tanker and watercraft filling points were operational on Days 11 to 13. Then followed a long period of consolidation as the area roads, accommodation and port facilities were developed for what proved to be an extended occupation 64.
This was the first operation where DUKWs were in numbers and given a pivotal as opposed to a supplementary task. They operated continuously and reliably in unloading ships, notably 1,300 tons by 26 DUKWs from one ship in 18 hours, including air alerts and other delays, so that 'the discharge programme would have been in a sorry state without them'. As side tasks they were used for floating ambulances, refuelling flying boats, mail deliveries, towing pontoons, moving patrols along the coast, ferries, beach recovery, mobile cranes and dumping dangerous ordnance at sea. They were hindered badly by poor Military Police control of traffic circuits and, as were the other transport companies, by low priority RAAF vehicles landed far too early, poorly waterproofed and driven, which drowned or bogged, obstructing beaches and exits, as had previously happened at Tarakan. But by the fourth day when the landing craft had been cleared and cargo ships began unloading, the unit settled down to a steady 24 hour clearance of about 1,200 tons a day with a capacity of 2,000 if the Engineer docks operating companies unloading the ships had been up to it, and were interrupted only by an enemy party's suicide attack on its position on Day 12 65.
The scattered nature of the operation, with several subsidiary landings and operations, meant a dispersal of the divisional resources. As had happened in earlier operations under the basic tropical scale of a supply depot company and one or more general transport companies, the need to operate dispersed areas led to each company headquarters controlling a mixed group of supplies and transport units: the age old nexus between the sinews of war and their means of delivery was hard to put down. Nor was the concept of segregation of GMC and jeep transport into different companies any more viable, here or elsewhere. Each area generally needed its slice of food, fuel and ammunition units, and needed a mix of vehicles, to cope with the different tasks which arose. The divisional AASC was regrouped so that HQ 2/6 Sup Dep Coy with two transport and two supply depot platoons operated AP, Sup P and PP at six locations for 20th Brigade Group on the mainland; HQ 2/156 GT Coy did the same in four locations for 24th Brigade Group on Labuan Island, and operated a local railway; HQ 2/142 GT Coy with six transport and two workshop platoons served divisional troops, resupply loading and watercraft unloading at Labuan, while two supply depot platoons originally with this company were reallotted directly under HQ CAASC to operate divisional troops delivery points. The composite system for divisional units, suitably adjusted for the particular task in hand, had naturally reasserted itself, just as it had in the first 1902 establishments for the upcoming AASC, again in 1941 and now in 1945. It remained in place until memory of the experiences of this war was overtaken by inexperienced tidy minds and peacetime expediency in 1972 when another 'new' solution discarded the accumulated wisdom of the centuries.
Support of Brunei-Labuan
The last, largest and the riskiest operation was Oboe Two involving the full 7th Division in landing at Balikpapan on 1 July 1945. With the Division were HQ Comd 7 Div AASC, 2/6, 2/153 GT Coys and 2/2 Sup Dep Coy; 2nd Beach Group included 2/108 GT Coy, 235 Sup Dep Pl and 58 BIPOD Pl; 7 Base Sub-Area included 2/21Tpt Pl (amph), 2/3 Amph Vehicle Increment, 2/25 Tpt Pl, 2/4 MAC Pl, 3 Sup Dep Coy, 20, 46 Fd Bking Pls, 66 BIPOD PI, C Det 4 Bulk Pet Storage Coy and 2 Port Det. Missing from the lineup was 1 Trk Amph Veh Pl, part of 1 Trk Amph Sqn which had been trained for these amphibious operations but withdrawn as the Americans did not want strangers mixed in with their two amphibious tractor battalions which were to provide the tracked amphibians required for the assault. CAASC Lieut-Col H.D. Murphie landed one hour after the first wave, but was preceded by 235 and 11 Sup Dep Pls from 2nd Beach Group and 7th Base Sub-Area, in 13 minutes after the assault to get the FSD ready to receive the initial stocking and meet any early demands. The brigades came ashore with their own reserves, but half of 2/7 Sup Dep was on the beach 80 minutes after the assault to support divisional troops, forty minutes later 2/10 Sup Dep Pl arrived to set up for 25th Brigade, and an hour later half of 2/34 Sup Dep Pl landed to support 21st Brigade. The remainder of the units staged in, usually preceded by their reconnaissance parties, a lesson well learnt from Oboe Six 66.
Demands on transport were well below capacity. From 2/153 GT Coy, equipped with jeeps and trailers, 2/7, 2/8, 2/9 Tpt Pls were attached one to each brigade, one being held for divisional reserve. They were landed loaded with ammunition and unit stores, and were used for ambulance, reconnaissance, radio carriers and supplementing unit transport. A vehicle from 2/7 Tpt Pl landed seven minutes into the assault was believed to be the first ashore in the operation. Advanced HQ 2/6 GT Coy landed after an hour to prepare for its first unit, 2/10 Tpt Pl equipped with 2½ ton GMCs, in less than two hours later. The remainder came in progressively over the following four days, hauling ammunition to the guns, water to units, assisting in beach clearance and then into the general maintenance of the division, with vehicles on 24 hour days and drivers 12 hour shifts in the early stages. 2/108 GT Coy with 2½ ton GMCs loaded with ammunition landed with the immediate task of ammunition resupply, but was not over-committed for its subsequent beach clearance task, a result of slow ship unloading, poor beach and periods of rough weather resulting in low and spasmodic landings of cargo, varying from 600 to 2,000 tons on various days. The company's DUKWs of 2/21 Tpt Pl landed carrying the guns and ammunition of the field regiments (this book's cover illustration), arriving 38 minutes after the first assault landing, the guns coming into action as they were unloaded. Their primary ship to shore task was largely redirected to bridging the gap between landing craft which could not get past a sand bar 30 metres from the beach; it also extended to carrying Auster aircraft ashore, river ferrying in substitution for a blown bridge, river patrols and reconnaissance, coastwise support of forces, and ferrying Macarthur ashore when a landing craft could not get through the surf 67.
Support of Balikpapan
This largest of the amphibious operations achieved its main objective of securing the airfields and oil resources. The next possible phases were a landing on Java and invasion of Japan, but the latter's surrender to avoid further nuclear attack on 16 August 1945 brought an end to hostilities. It did not, however, end the tasks of the deployed Australian forces numbering 157,000, which still had 344,000 Japanese and their auxiliaries under arms in their areas, from Borneo to the Solomons, to be brought under control and then repatriated. There was also the transition to civil government, fairly straightforward in the Australian and British territories, but a problem in the Netherlands East Indies, where a Nationalist declaration of independence for Indonesia on 17 August left the inhabitants unconvinced that they should return to Dutch rule. Forces not only had to remain in their end-of-war positions, but also extend to other areas to maintain order, concentrate the Japanese forces and supervise transfer to civil authority. A further logistics factor was the shortage of shipping with which to repatriate the Australian forces for demobilisation. These commitments and slow return of forces home required AASC elements to remain in support into 1946. The other factor was the return of the remnants of 20,000 Australian prisoners of war of the Japanese, whose anticipated condition required special arrangements 68.
The early German and Japanese runaway successes ensured that large numbers of Australian soldiers found themselves prisoners of war, and AASC members were no exception to this. Indeed the number of AASC captured was swollen by three command decisions – the priority of evacuation in the Greece-Crete evacuations, the premature surrender of undefeated troops in Singapore, and the commitment of forces to a hopeless defence of Java, and to a lesser extent the island garrisons. The story of these prisoners is in two parts: one of a belligerent which conformed in a substantial degree to the Geneva conventions, and the other which not only did not, but regarded prisoners with contempt and used them as expendable chattel slaves. When the casualty lists of World Wars 1 and 2 are compared, and it is remembered that the fewer AASC numbers in the first conflict was balanced by the majority being within gunfire range for most of the time, the death rate is very disproportionate. The simple answer lies in the large numbers of prisoners of the Japanese who met needless deaths in flagrant disregard of the usage of war observed by civilised peoples.
AASC prisoners from Greece, Crete and the Middle East found themselves in a variety of camps throughout Axis-occupied Europe. Many had the combination of ingenuity and luck to find their way back to friendly lines without being captured, such as Maj F.W. Maclean of HQ 6 Div AASC who commandeered a caique to get from Greece to Crete, and Dvr J.L. Smith of 6 Div AASC who was in a party which sailed a barge from Crete to Egypt. Some of the captured who became escapologists joined resistance forces: Sgt R.S. Turner, left behind at Corinth, was captured, escaped in transit near Lamia and, hiding out for 18 months with the help of Greek patriots, joined the guerrillas and then the Allied Military Mission at the end of the war; Pte L. Saywell, escaping from the camp at Pardubice, joined the Czech partisans, was killed in action at the very end of the war and was awarded the Czech Military Cross. Others made their way through occupied territory to freedom: Dvrs C.W. Croucher and K.H. Griffin of 6 Div AASC were recaptured after an escape from Austria, tunnelled out again and made it to Gibraltar. Those who did not escape were held in a wide range of camps in Germany, Austria and Italy, however the capitulation of the latter in September 1943 gave many the opportunity for escape to neutral Switzerland, Capt H.J. Kroger of 6 Div AASC becoming Senior Australian Officer in the Swiss holding camps while awaiting repatriation. Many prisoners were allotted to work camps throughout the Axis countries for road and rail works, factories, farms and forestry where their treatment varied from adequate to severe, depending on the taskmasters. Access to the International Red Cross allowed by Germany and Italy was an additional factor in both maintaining some reasonable standard of treatment and in providing food and comfort parcels to augment the subsistence levels provided by the captors; the later deterioration in these levels was a function of increasing shortages suffered by the whole Axis population rather than calculated maltreatment of the prisoners 69.
Those AASC members who fell into the clutches of the Japanese had quite different treatment. Whilst a few were executed after capture at Ambon and Rabaul, the remainder faced more protracted abuses. The main group of nearly 2,000, from 8 Div AASC, the Ammunition Sub-Park and the supplies and medical transport elements on Singapore Island, was initially herded with the other 50,000 prisoners into the Changi area, the Australian forces occupying Selarang Barracks; the second large group of nearly 700 from 2/3 Res MT Coy and part of 2/105 GT Coy caught in Java was eventually concentrated in the Bicycle Camp at Batavia; a few remained in Ambon, Timor and Rabaul from which most were moved later to the main concentration areas.
On Singapore the RASC set up a base supply depot to issue to all of the captive formations, of which the AASC provided a small element; 8 and 9 Sup Pers Sects established a DID to receive bulk and issue to AIF units while 1 Fd Bky baked bread. CAASC 8 Div Lieut-Col Byrne was responsible for food, an AIF canteen and purchase of hospital supplements, and distribution of Red Cross foodstuffs and firewood; these were, however, progressively transferred to HQ AIF's direct control as AASC officers and members were progressively included in work groups requisitioned by the Japanese. After the initial period when the Japanese left their prisoners to their own devices, about 1,000 AASC members were absorbed into the work parties throughout the island on clearance of war damage, the wharves, warehouses and salvage, under the command of Maj J.H. Parry of 2 Coy and Maj R.V. Glasgow of 8 Div Amn Sub- Park. Those groups returned to Changi at the end of the year but by then depletion of the numbers had already commenced in a series of 'forces' sent abroad, formed from the POW population at large, in which AASC provided its proportionate one eighth of the AIF representation. First was the 3,000 man A Force, including 450 AASC members with Senior Supply Officer Maj F.J. Campbell, sent to Burma in May 1942 for airfield construction at Victoria Point, Mergui and Tavoy, where conditions and work were tolerable. Next B Force including 308 AASC under Maj J.B.J. Lawler of 1 Coy in July left for airfield work at Sandakan in North Borneo; and an initial group of 33 men under Lieut G.F. Hamilton in August to Japan 70.
A significant change came to the work party scene in Singapore after the early months. Hitherto they had provided the opportunity for a break from the Changi environment, the opportunity to earn work pay from their captors, and on the side acquire any food or useful property which they might be able to get away with, but from hereon the drafts were headed for the Thai-Burma railway and Borneo. In October 1942 A Force had been augmented by two other forces from Java via Changi, one of which was Blackforce commanded by Lieut-Col C.M. Black with his 2/3 Res MT Coy and 2/105 GT Coy. The entire group was directed to the Burma section of the railway, and the increasing work quotas and casualties from overwork, diet, exposure, brutality and disease began to take their toll, minimised only by the dedication of A Force commander Brig A.L. Varley of 22nd Brigade and his medical staff in ameliorating some of the worst excesses; but the over-age men of the reserve motor transport, expected to suffer particularly severely in these adverse conditionsm held their own with thir younger co-prisoners. The other major group to the railway from Changi was F Force, committed to the Thai section in April 1943, one of whose four AIF battalions was commanded by Maj J.H. Parry and comprised AASC members and others. Committed piecemeal with other smaller forces on the Thai section, and without an Australian leader of Varley's calibre, these groups suffered severely, the most effective intervention coming from such medical leaders as Maj Bruce Hunt.
While Capt A. Mull in A Force had found the odds of escape stacked against him, being shot when intercepted by hostile locals north of Moulmein, those in B Force in Borneo found an apparently more conducive environment. Shortly after arrival at Sandakan, six AASC members got away – LcpI H.R. Thackson and Pte M.J. Carr of 1 Coy and Dvrs E.A. Allen, M.E. Jacka, N.A. Shelley and T.I. Harrington of 8 Div Amn Sub-Park, only to be caught and sent to the horrors of Outram Road prison in Singapore for a four year sentence. E Force with Lieut M.J.K. Potter and 25 other 8 Div Amn Sub-Park members plus 15 from 2/2, 2/3, 2/4 Res MT Coys and 2/3 MAC arrived in April. Sgt R.W. Butler joined an escape party which made its way to the Philippines where he joined the guerrilla movement and was killed in action, an honourable death which was denied to most of his fellows, who were brought to death or murdered in the infamous death marches in the closing stages of the war. WO2 C.Y. Watson of 8 Div AASC commanded the first Australian group of 350 on this march to Ranau at the end of January 1945 but when the second party arrived they found only five had survived systematic starvation. Two AASC members of the later group made their escape from the final tragedy – WO2 W.H. Stipcewich of 8 Div AASC and Pte H. Reither of 2/4 Res MT Coy, warned of impending massacre by a friendly guard after 9th Division's landing; Stipcewich survived, one of six out of nearly two thousand Australians.
Prisoners of Japan
As well as the initial group sent to Japan in 1942, two other major ones containing some AASC members arrived in 1943 – G Force commanded by Maj R.V. Glasgow of 8 Div Amn Sub-Park in April and J Force under CAASC Lieut-Col Byrne in May. These groups provided labour in mines, shipyards, oil drilling and other industrial work, on below-subsistence rations and subject to the usual brutality. Others were scattered in small numbers throughout the Islands, Capt S.A. Rose the surviving AASC officer from Ambon and the remainder of that force being subjected to calculated attrition leading to 75 percent mortality 71. The large numbers of AASC deaths in World War 2, compared with the lesser numbers from the continuing intense fighting in World War 1, are substantially the result of this cowardly and barbaric abuse of defenceless men. While succeeding generations of Japanese cannot be held responsible for the sub-human behaviour of the perpetrators, it was a widespread aggravated act which cannot be forgiven – being without acknowledgement, apology or prospect of reparation. It must remain a national blot to be erased by ongoing responsible civilised behaviour.
Evacuation of Recovered Prisoners
Occupation of Japan
For some time after the Japanese surrender it seemed as though the Australian forces might not, as happened after World War 1, participate in the occupation forces. Protracted negotiations with a reluctant US Command saw a decision that a Commonwealth presence in Japan was necessary ‘to represent the British Commonwealth prestige in the eyes of their allies and the Japanese' and 'to demonstrate to the Japanese their democratic ways of life and living standards' – lofty objectives indeed, and unfortunately the latter not always lived up to. Although the contingent was to be known as British Commonwealth Occupation Force, the United Kingdom forces were initially committed to reclaiming their prestige in their occupied territories and protectorates, so Australia took an initial leading role – 34th Brigade and supporting troops were concentrated at Morotai, arriving in Japan in the late winter of 1946 by which time the US forces were well and truly entrenched.
HQ 34th Brigade, accompanied by HQ 168 GT Coy, 122 Tpt Pl and 168 Wksp Pl, arrived at the designated British Commonwealth Base area in the devastated naval base of Kure on 13 February, commencing unloading of their own transport ship immediately and so beginning seven months of twenty-four hour shift operation. The follow up elements, 256 Sup Dep PL, 20 Fd Bch Pl and Det 6 MAC were in the base three weeks later, to be followed shortly after by further units raised at Bathurst: HQ CAASC BCOF, HQ 169 GT Coy, 123 and 124 GT Pls, 169 Wksp Pl, 257 and 258 Sup Dep Pls to service the other concentrations of Australian forces. DDST Col H.M. Frencham and staff were part of HQ BCOF on Ita Jima Island near Kure. The original company was progressively built up with 119, 120, 121Tpt Pls, and the supply organisation by HQ 41 ASD, 252-255, 257 and 258 Sup Dep Pls, 47 Fd Bky, 6 Refrig Plant Op Pl, 78 BIPOD Pl and 8 Port Det; RASC and RIASC units supplemented this group, although these were withdrawn with the UK forces two years later. A succession of commanders of this grouping began with CAASCs Lt Cols C.E. Jones and R. Durance, then CRAASCs Lt Cols W.L. Day, H. Fairclough and B.J. McNevin 72.
Map 11: Japan and Korea 1946-56
The function which required such an extensive array of supplies and transport units and over 1,000 men was the provision of transport, food and fuel to a BCOF which, with the British and Indian Division and New Zealand Brigade and Air Forces reached a peak of 35,000, and so represented a small city. There was no possibility at first of using local resources due to both the nature of the force in a hostile country and the collapse of the local capacity to even look after its own needs adequately, requiring the importation of virtually everything. Nor were the ports operating smoothly, resulting in drivers clearing the constant backlog of ships, totalling 88 in the first 15 months, to lodge and build up reserves for the Force, working 12 hour shifts in semi-open vehicle cabins in winter; the port and supplies units had to match this effort with receipts and issues, though they at least had some protection from the weather inside buildings.
Dispersion of the force and AASC's liability to provide certain support for the other Services and those of New Zealand, United Kingdom and India sent detachments to other areas to provide local transport and detailed issue depots. BCOF Headquarters on Ita Jima Island was served by a detailed issue depot and transport detachment; in the BCOF base at Kure were 168 and later 169 GT Coys, 41 ASD and 8 Port Det; at Hiro supplying 34th Brigade and other units were 252 Sup Dep Pl and 47 Fd Bky Pl; the Japanese bulk fuel installation at Yoshiura was operated by 78 BIPOD Pl. British and Indian Division and New Zealand units were provided with DIDs and bakery detachments at Takamatsu, Okayama, Yonago, Koti, Kaitachi and Shimonoseki. And in Tokyo, Ebisu camp was also maintained with a detachment of 252 Sup Dep Pl and 47 Fd Bky Pl. Fresh vegetables, at a premium in view of the fertilising methods in Japanese market gardens, were progressively supplied by the Farm Section included in 253 Sup Dep Pl which operated at Iwakuni RAAF Base 73.
The British forces left in 1948, at which stage the RAASC units were consolidated to support the Australian force: the supplies units into 41 ASD, BCOF Bking Pl, BCOF Bchy Pl and BCOF Cold Storage Operating Pl; transport was provided by 119, 120 and 121 Tpt Pls; Iwakuni and Ebisu retained their detachments. Further streamlining was effected in early 1949 with return of the Yoshiura fuel depot to Japanese interests and the closure of Hiro depot. United Kingdom forces returned with the Korean War in 1950, and with the transfer of Australian infantry battalions to Korea, the Australian component in Japan was progressively replaced by RASC units. The peace treaty with Japan also converted the Occupation Force to one supporting the effort in Korea, to which the Australian component continued to make a major contribution; in December 1951 the change was recognised by the replacement of BCOF with British Commonwealth Forces Korea. The RAASC component reduced to 252 Sup Dep Pl and 119 Tpt Pl at Kure and 121 Tpt Pl at Ebisu, under control of ADST BCFK, and was further eroded as the RASC took over the transport task. Finalisation of the Korean commitment saw the last unit 252 Sup Dep Pl withdrawn in October 1956 74.
Support of BCOF and Korea
So ended a task which had begun in 1939 as a potential re-run of 1914-19 in which the AASC had operated within the British ASC support structure in a European war, and continued virtual peacetime activities at home. This had changed in mid-course to an independent responsibility for support of a home base organising under apparent threat of attack, then expanding overseas to defend and recapture the island chain to the north, and finally participating in the postwar settlement. In this second phase the Corps came fully of age, fully supporting its own armed forces and also to a degree those of the United States of America in Australia and New Guinea, then the Commonwealth forces in Japan, which itself preceded a new conflict.
That new conflict also arose from circumstances different to those at the end of World War 1. Then Australia had largely avoided the entanglements in the extended post-war occupations and the ongoing wars which settled the belligerents' boundaries, ending its minor commitments in North Russia and Egypt quickly, concentrating on getting its forces home and demobilised, and so tacitly acknowledging that the war in Europe and the Middle East had not really been Australia's, only the sideshow in the South Pacific had. But the end of the war in the Pacific in 1945 left Australia with a vested interest in controlling its aftermath. The post-World War 1 settlement in the Pacific had indeed removed Germany from the scene, with its territories there mandated to the victors. But Australia's perceived nemesis Japan had been one of the victors, had emerged enhanced in power and territory, was no longer constrained by the Anglo-Japanese Treaty, and not only threatened Australia directly in World War 2 but also destabilised the whole region, leaving it open to a more pervasive and penetrating influence than had been the rapacious Greater East Asia Co-Prosperity Sphere.
Australia in August 1945 had both the opportunity and the incentive to help stabilise the area, by assisting the return of colonial government in the area and by participating in the disarmament and restructuring of Japan. However Japan's defeat, as had Hitler's, merely replaced old adversaries with new. The Australian Army was soon facing a different task with these new threats centred not on the traditional and debatable call of fighting England's enemies but in forward defence in its own region, helping contain the spread of doctrinaire totalitarian regimes from expanding through fostering proxies and capturing genuine nationalist movements. In the first of these containment wars in Korea RAASC's preponderant role in the Occupation Force in Japan made it for once a significant element in the base supporting structure, but this was not to be without its debit in allowing the other Commonwealth ASCs to claim the battlefield function.
Footnotes
2. Butlin S.J. War Economy 1939-1942 p298; Long To Benghazi p41-42; AA MP730/1 23. As late as War Cabinet Minutes of 13 August 1941, procurement of four wheel drive vehicles for units in Australia was refused, and forces overseas were to be equipped by purchases direct from UK.
5. AWM 52 10/2/21 January-September 1941 Notes on 6 Div AASC, p1.
6. AWM 52 10/2/21 6 Div AASC Notes; 10/25/6, 10/32/16, 10/37/9.
7. AWM PR 82/123 Russell Papers.
8. AWM 52 10/2/21, CAASC Notes.
9. Maughan B. Tobruk and El Alamein, p109, 121-2: AWM 52 10/2/24 June-July 1941 Ammunition Supply Summary.
10. AWM 52 10/2/24 June & July 1941.
11. Maughan, p170, 332; AWM 52 10/32/19 January-Mav 1941; 10/25/9 January-December 1941; 10/37/10 January-June 1941; 10/37/12 April-September 1941.
12. AWM 52 10/2/24 June-July 1941; 10/25/9 May-December 1941; 10/32/19 June-December 1941; 10/37/12 April-September 1941; Whitty H.M. et al eds The Story of the Royal Army Service Corps 1939-1945 p130.
13. Maughan, p193, 201, 238-39.
15. Maughan, p300: AWM 54 391/12/15; Fairclough, p137; AWM 52 10/2/24 June-July, August-September 1941; 10/32/19 May-July 1941; 10/37/10 January-June 1941.
16. AWM 52 10/2/24 August-September 1941; 10/37/10 July-December 1941.
17. Long G. Greece, Crete and Syria p4, 39-41, 54, 65-6, 72-3, 80, 83; AWM 52 10/2/21 Notes on 6 Div AASC p4; 10/22/1; interview WA. Bunting.
18. AWM 52 10/22/1, 10/25/6, 10/32/16, 10/37/9 March 1941-January 1942; AWM 88 391/12/20, AMF 3/C.
19. AWM 52 10/2/21 Notes on 6 Div AASC; 10/22/1, 10/25/6, 10/32/16, 10/37/9 March 1941-January 1942; Maughan, p755; Long Greece, Crete and Syria p171-2, cf p304.
20. Long Greece, Crete and Syria p181, 205; AWM 52 10/32/16, 10/37/19 March 1941-Januarv 1942; AWM PR 82/123 Russell Papers; interview W.A. Bunting.
21. AWM 52 10/32/16, 10/37/9 March 1941-January 1942; interview W.A. Bunting.
22. Long Greece, Crete and Syria, p326-7; AWM 52 10/2/22 July-September 1941 History of S&T Services 7th Division Syrian Campaign, p2, 4.
23. History of S&T Syria, p1-9.
24. AWM 52 10/2/24 June-September 1942; 10/17/10 September-December 1942; 10/17/11 August-December 1942: 10/17/12 August-November 1942.
25. AWM 52 10/2/24 October-December 1942; 10/17/10 September-December 1942; 10/3/6 October-December 1942.
26. Enclosure to Air Force HQ Far East S/2758/Ops dated 22 January 1941.
27. AWM 52 10/2/23 March, August, October 1941; Whitty etc RASC 1939-45, p308.
28. Wigmore L. The Japanese Thrust p146, 156, 283; Stewart I.MacA. History of the Argyll & Sutherland Highlanders, 2nd Battalion p42-3; AWM 52 10/11/3 December 1941.
29. AWM 52 10/11/4 December 1941; 10/11/2 December 1941-February 1942.
30. AWM 52 10/2/23 January-February 1942; 10/32/28 January-February 1942.
31. AWM 52 10/2/23 January-February 1942; Wigmore, p324-5, 344-5, 348-50, 383; Maj A.E. Saggers letter in Fairclough, p 168-70; AWM 52 10/32/28.
32. Wigmore, p457, 497-7, 499, AWM 54 559/22 Blackburn Report.
33. AWM 52 10/1/46 December 1941; AWM 54 573/6/10 of 1 January 1942.
34. AWM 52 10/1/45 December 1941; Beaumont J. Gull Force p26, 48, 53-55; Wigmore, p425, 436; AWM 54 578/6/1A, B. Scott Report Appendix A McRae Report; RACT Museum DST Files 6/17.
35. Wray C.C.H. Timor 1942, p43, 78, 79, 82, 89, 100, 109, 111, 134, 148, 158; AWM 52 25/3/2 May-December 1942; RACT Museum DST Files 6/17.
36. Establishment IV/1940/30A/1; Wigmore, p394, 398, 653, 667, 672-3; AWM 54 607/8/2, 243/6/14.
37. AWM 52 10/1/12 AWM 54 431/13/6 DST Report and Appendix X; 703/550.
38. McCarthy, p38, 115-8, 124f, 130-2, 136, 140, 245-6: AWM 52 8/2/21 August-October 1942 21st Brigade Report; 10/2/14 August 1942; 10/2/22 October-December 1942 7th Division Report.
39. AWM 52 10/2/22 September 1942, AASC 7 Div Report October-December 1942 where the AASC officer is named as Lieut Edwards, but such a name does not appear in the contemporary NG Force list – a Lieut C.W. Edmunds does however enquiries have failed to resolve this; 10/17/4 July-December 1942; 10/17/4 July-December 1942; Patterson J.M. 1st Australian Pack Transport Company AIF; AWM 52 10/13/1 August-November 1942; 8/2/1 August-October 1942 Report Part 4.
40. McCarthy, p121-2, I59, 161, 163, 186 AWM 52 10/2/15 August-December 1942; 703/5/50, 1/5/25, 10/17/24 July-October 1942; 10/17/6 January-February 1943; Fairclough, p231.
41. AWM 54 431/13/6 DST Report p7-8 AWM 52 10/3/50.
43. McCarthy, p534-5, 578-9; Dexter D. The New Guinea Offensives p23, 56-7; AWM 54 431/13/6 DST Report and Appendixes VI, X; 65/1/2 North Report.
44. Dexter, p68, 71, 194; AWM 54 431/13/6 DST Report and Appendix X; 587/14 S&T Reports.
45. AWM 52 10/2/15 May-August 1943 and Appendix A; AWM 54 587/7/14 S&T Reports.
46. Dexter, p230, 282, 331, 358; AWM 52 10/2/22 September-October Lae-Dumpu Campaign; 10/18/2 June-December 1943.
47. Dexter, p337, 348-50; AWM 52 10/3/55 May-December 1943.
49. Dexter, p446, 448, 450, 452, 457; AWM 52 10/2/24 July-December 1943; 10/3/55 May-December 1943; 10/3/55 May-December 1943; 10/2/24 July-December 1944 10/1/20 March-April 1944.
50. AWM 52 10/2/20 January-February AASC Operations: Huon Peninsula Campaign.
51. AWM 52 10/2/22 September-October Lae-Dumpu Campaign.
52. AWM 52 10/2/20 August-December Report April-September 1944.
53. Dexter, p790-11 Long Final Campaigns p19, 47-9.
54. Dexter, p790; Long, p71-2; Charlton P. The Unnecessary Campaigns.
55. Long, p272, 281-3, 294-6, 314, 334, 381, 384-8; AWM 52 10/2/21 October 1944-July 1945; AWM 54 603/7/8, 703/5/35.
56. Long, p100, 112-113, 116, 122, 128-9; AWM 54 613/7/6 Report October 1944-March 1945.
57. AWM 52 8/2/7 November 1944-March 1945; 8/2/11 December 1944-August 1945; 8/2/23 April-August 1945; 10/1/19 November 1944-June 1945; AWM 54 613/7/6 Reports April-May, June-August 1945; AWM 52 10/2/18 September 1944-August 1945.
58. Long, p241, 256, 260, 265.
59. AWM 52 10/2/20 January-April 1945 Appendixes 345, 346.
61. AWM 52 10/1/2, 10/2/35;AWM 54 703/5/84.
63. AWM 54 703/5/20; Long, p450-2; AWM 52 10/31/1 March-June 1945 Report; 10/1/2 January-June 1948 Report.
64. Long, p459, 472, 484; AWM 52 10/2/24 March-June 1945; AWM 54 703/5/20.
65. AWM 54 619/7/33 S&T Report, p4-5; Report by 2/106 GT Coy.
66. AWM 54 619/7/33 ST Report; AWM 52 10/2/24 March-September 1945.
67. Long, p506; AWM 52 10/1/2 Report on DUKWs; 10/2/22 July 1945 Report Section D; AWM 54 703/5120.
68. Long, p555; AWM 52 10/2/22 July 1945 Report Sections E, F.
69. Maughan, Appendix 1; AWM 3DRL 2724.
70. AWM 54 554/1/1; Wigmore, p511-4, 519, 534, 541-4.
71. Wigmore, p545-6, 548, 550, 561, 571f, 593, 596-604, 613-4, 622f; Nelson H. Prisoners of War, p113, 116; Beaumont Gull Force p134-9; AWM 54 554/1/1.
72. AWM 52 10/2/37 AASC BCOF; AWM 114 63/2/11.
73. AWM 52 10/2/37; AWM 114 703/10/2; interview D. White; RAASC Quarterly Bulletin No 4 1952.
74. Bunting W.A. The Royal Australian Army Service Corps in Japan; AWM 52 10/2/37.